F5 Distributed Cloud > F5 Distributed Cloud: Policy Optimization in a Multicloud World > Module 2: Multi-Cloud App Connect Source | Edit on
Lab 4: App Connect - Solving IP Overlap
Objective:
Implement App Connect to overcome IP address overlap in AWS/Azure
Provide private and secure connectivity between all sites
Configure Service Policy to only permit specific HTTP methods
Review network security events in the F5 Distributed Cloud Console
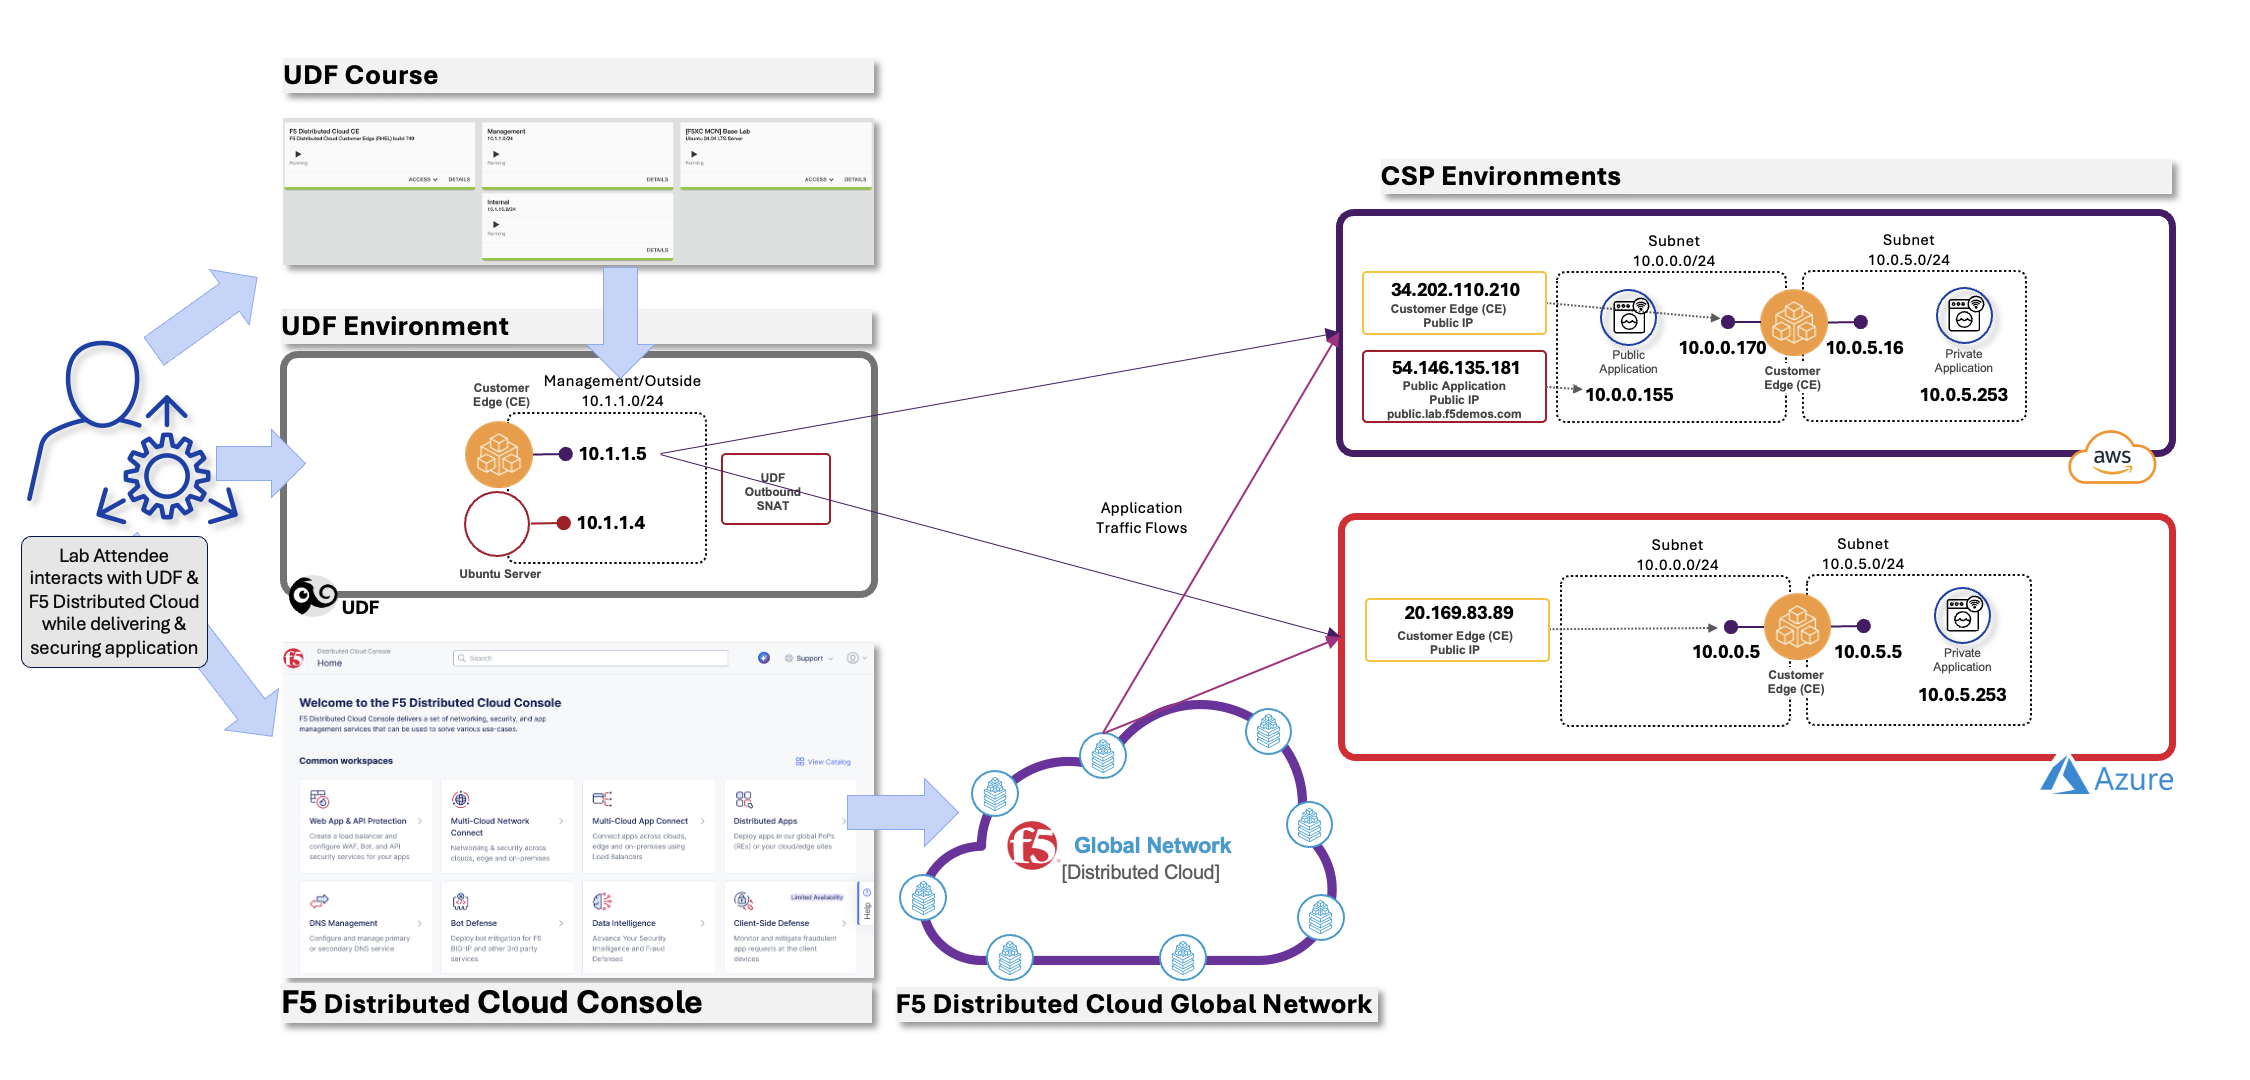
ACME Corp needs to establish connectivity between AWS and Azure workloads that have overlapping IP addresses. Using App Connect, you will create internal load balancers that act as Software-Defined Proxies to enable secure communication between these environments.
Note
App Connect uses CE Nodes as Software-Defined Proxies (Layer 7) to solve IP overlap challenges, unlike Network Connect which uses Software-Defined Routers (Layer 3/4).
Prerequisite
Note
You really should have completed Lab 3 at this point, if not, then I don’t know what you have been doing this whole time 🙃
Task 1: Understanding the Lab Environment
Narrative:
Now that the globally available frontend has been deployed, you need to configure backend connectivity between AWS and Azure. Since these environments have overlapping IP addresses, you will use App Connect proxies instead of Network Connect routing.
Lab Environment Overview:
AWS and Azure workloads both use 10.0.5.253 (IP overlap)
App Connect will use CE Nodes as proxies to overcome IP overlap
Internal load balancers will provide secure connectivity
Service Policies will enforce allowed traffic
Your goal is to create internal load balancers that enable secure communication between overlapping IP environments.
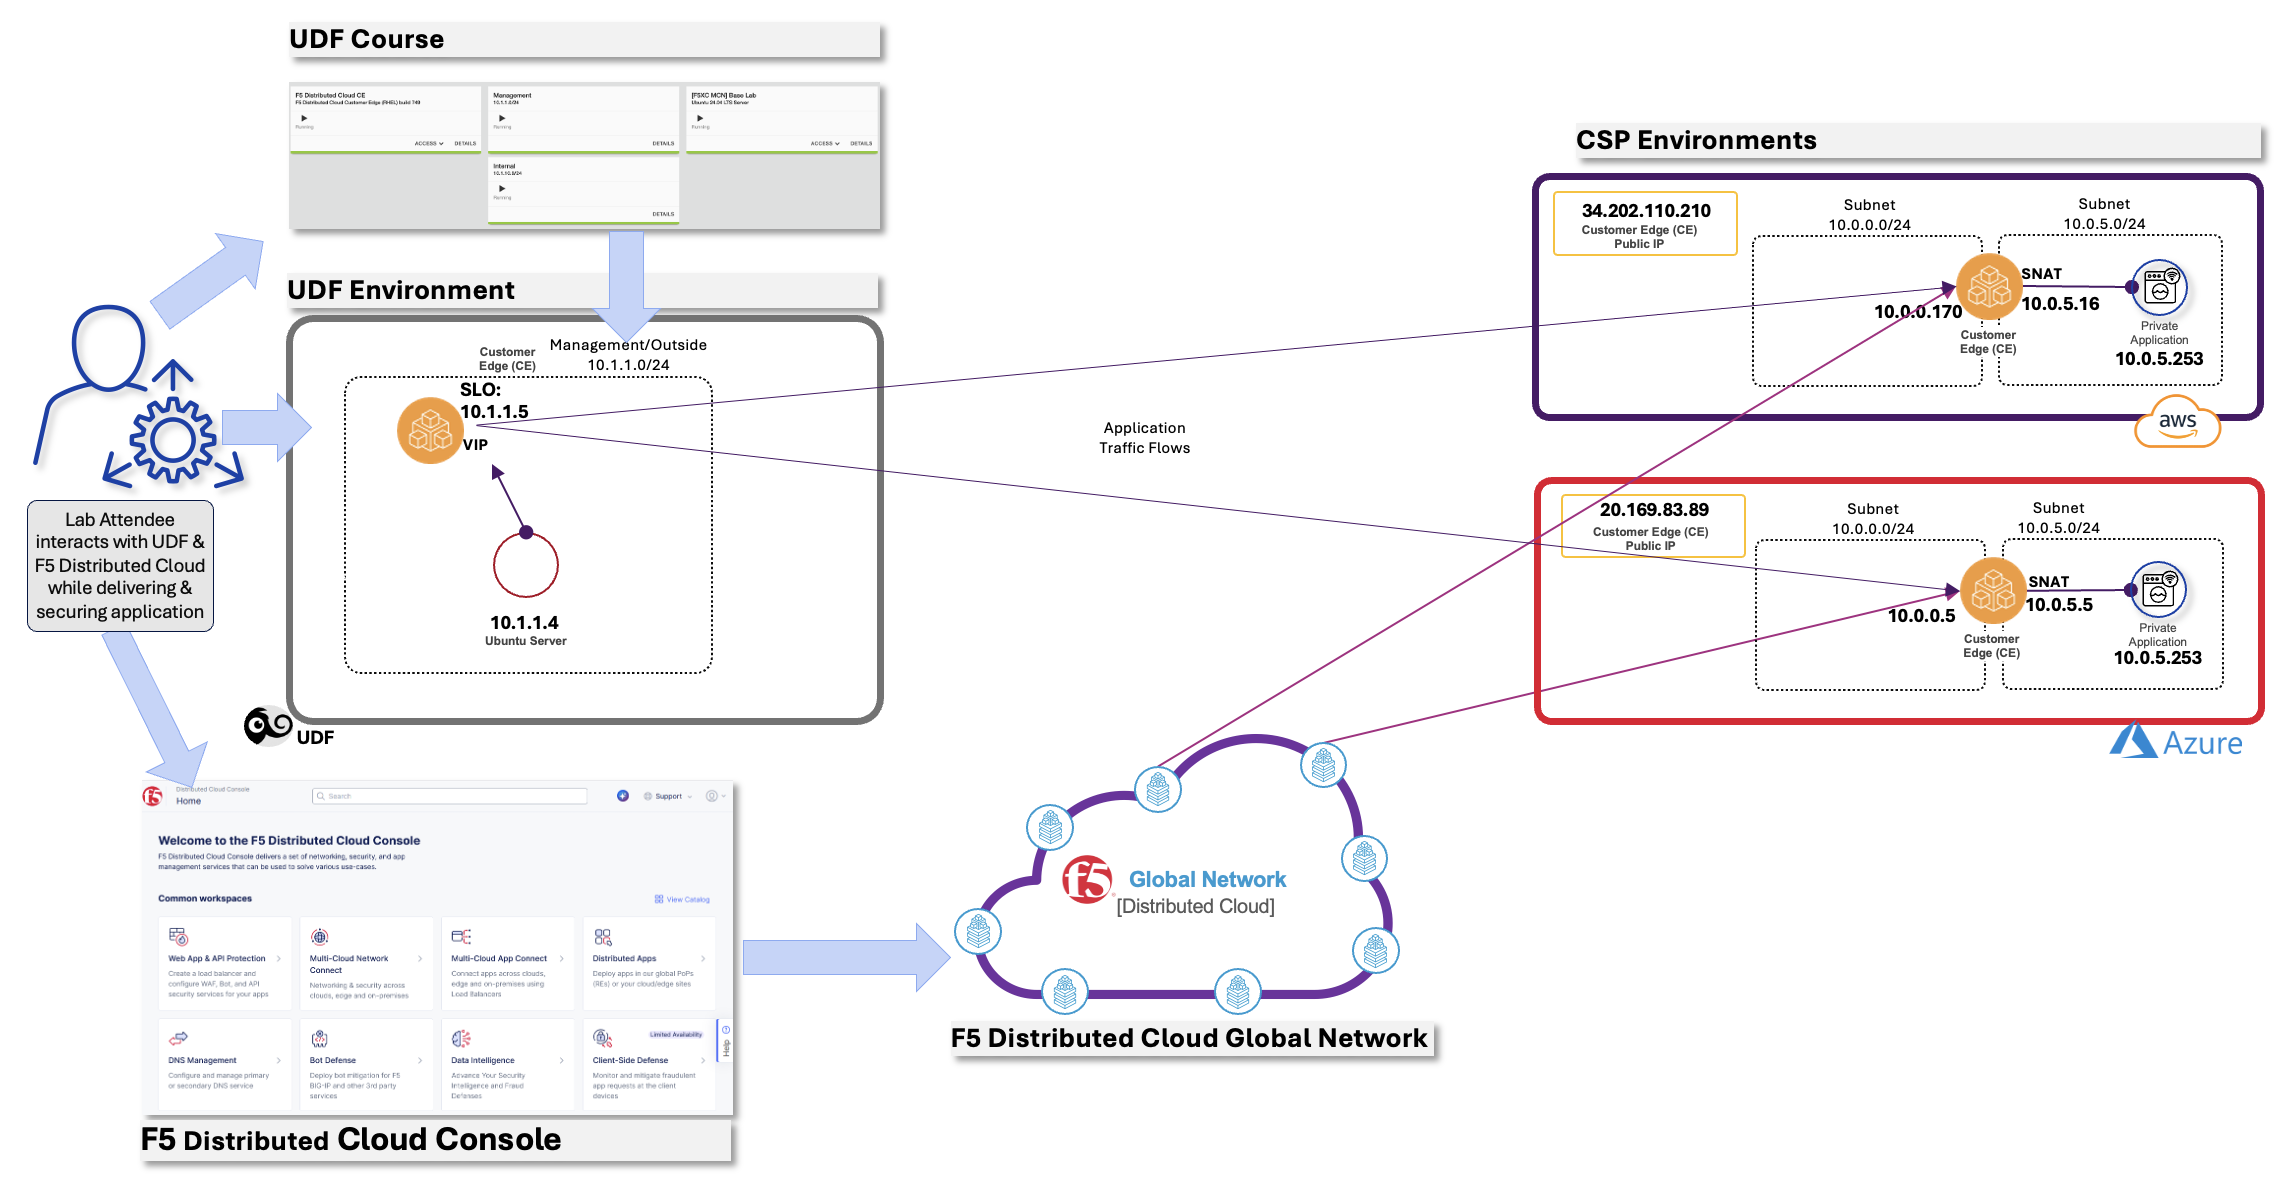
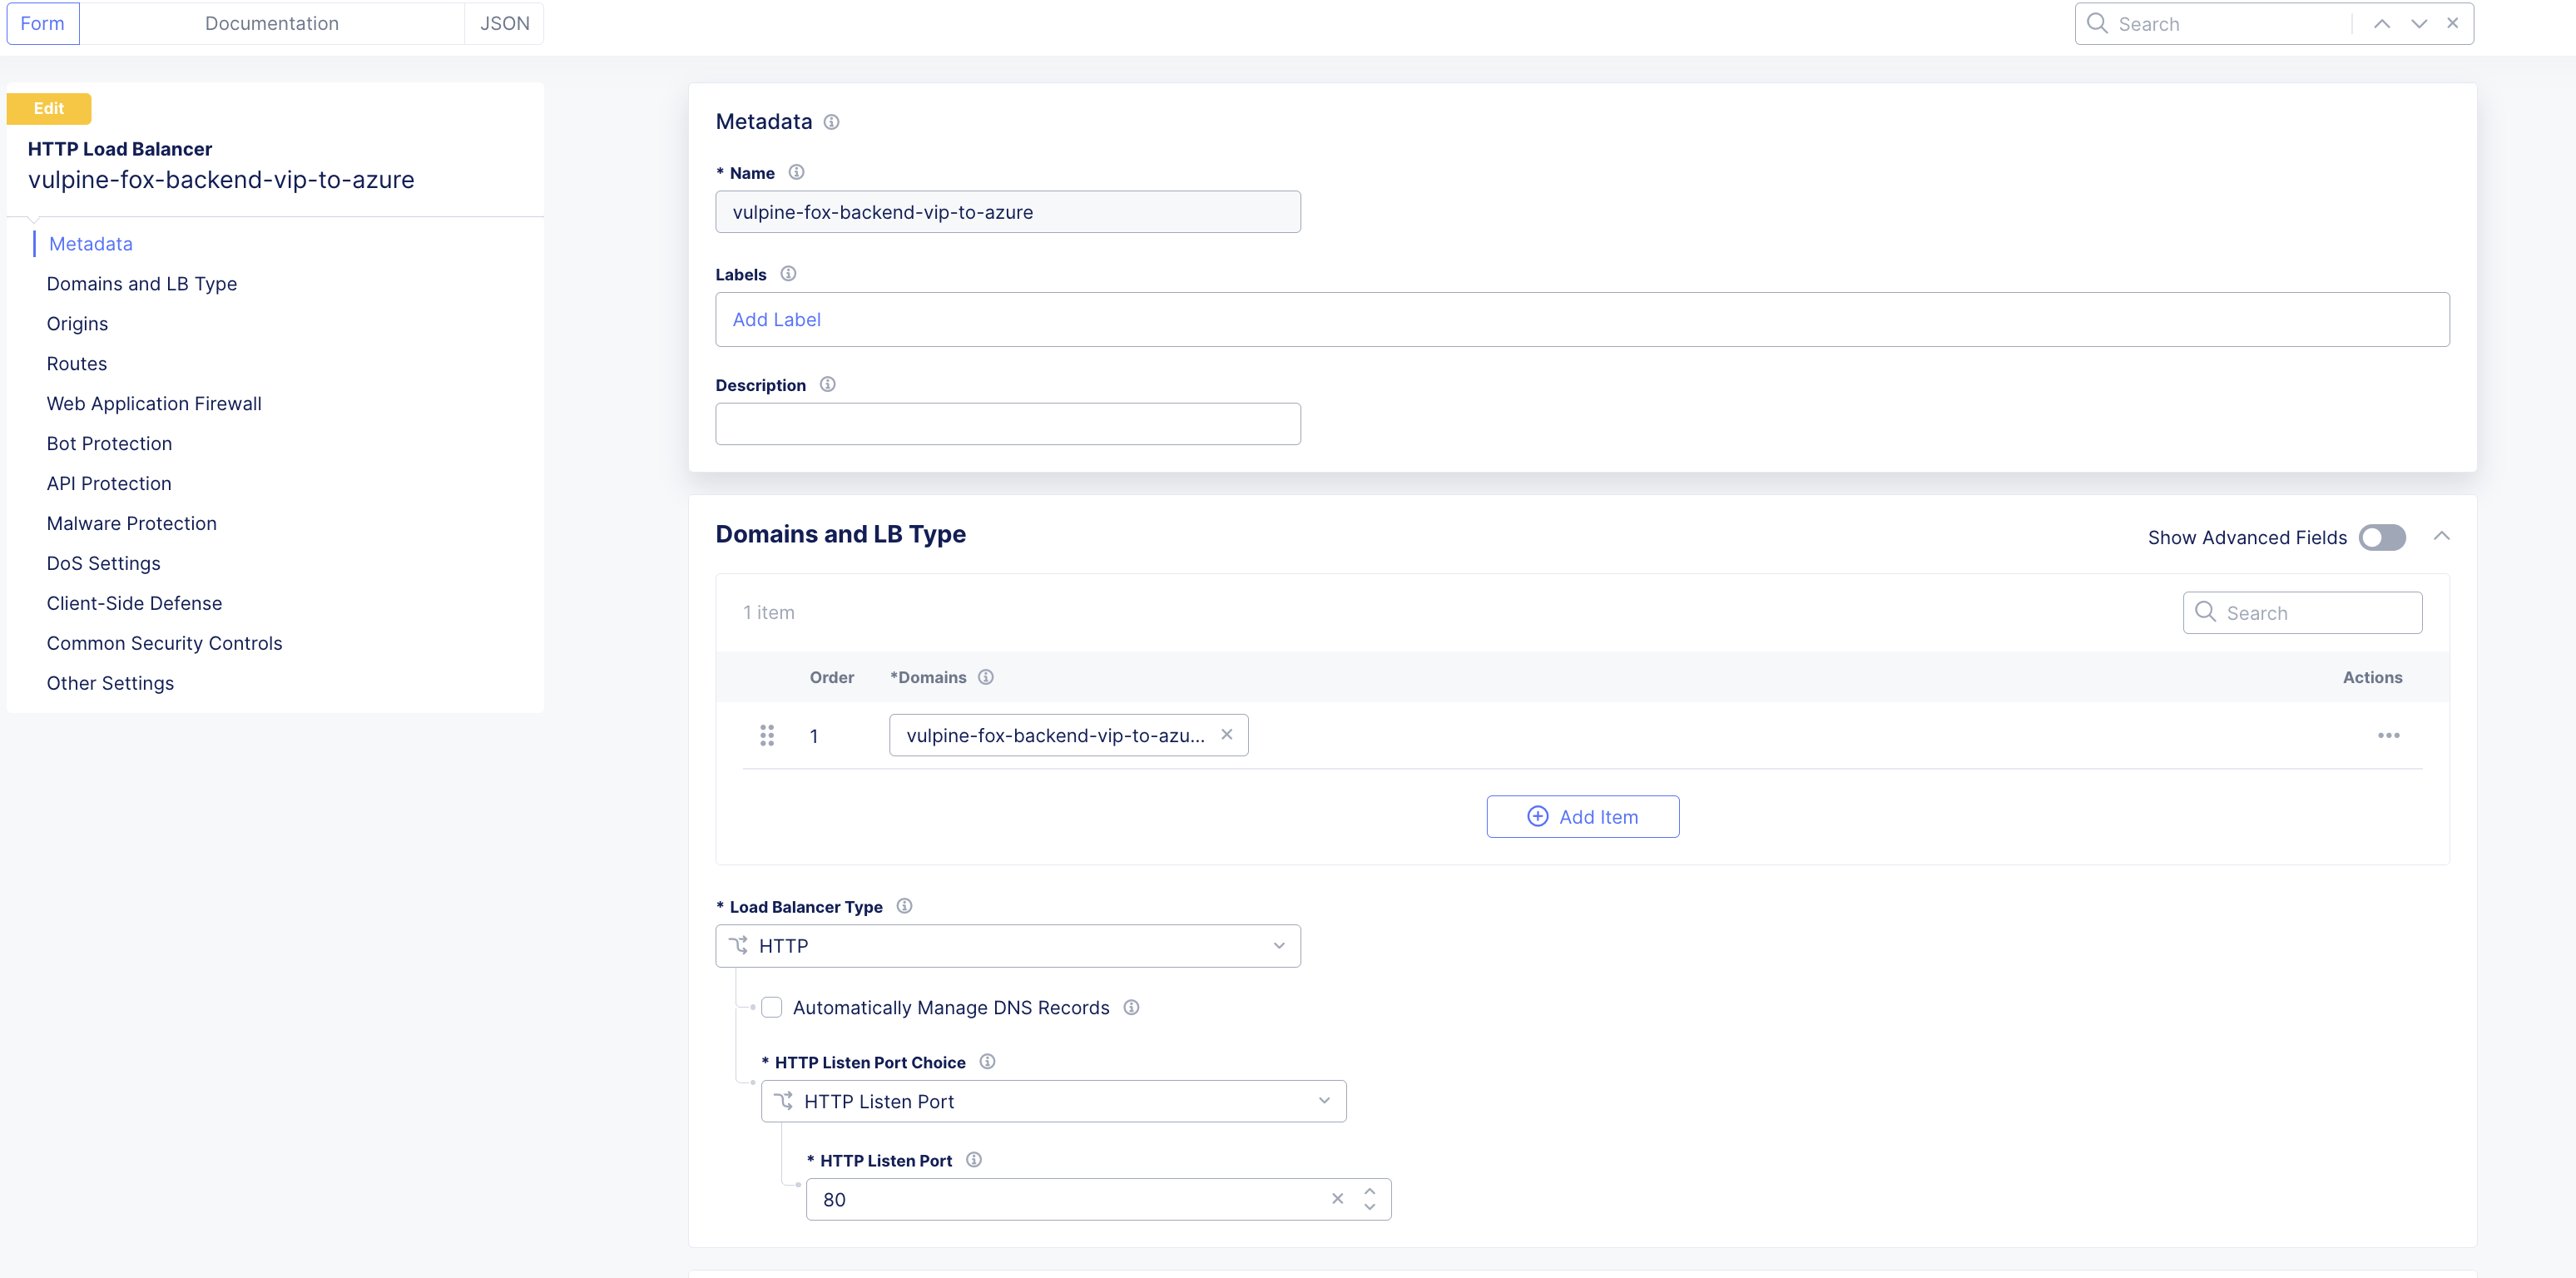
Task 2: Create Backend VIP to Azure
You will now create an internal HTTP load balancer on your Data Center CE that connects to the Azure workload.
Navigate to Multi-Cloud App Connect >> Manage >> Load Balancers >> HTTP Load Balancers.
Click Add HTTP Load Balancer.
Configure the load balancer:
Variable
Value
Name
<your-namespace>-backend-vip-to-azure
Domains
<your-namespace>-backend-vip-to-azure.lab-mcn.f5demos.com
Load Balancer Type
HTTP
Automatically Manage DNS Records
Unchecked
HTTP Port
80
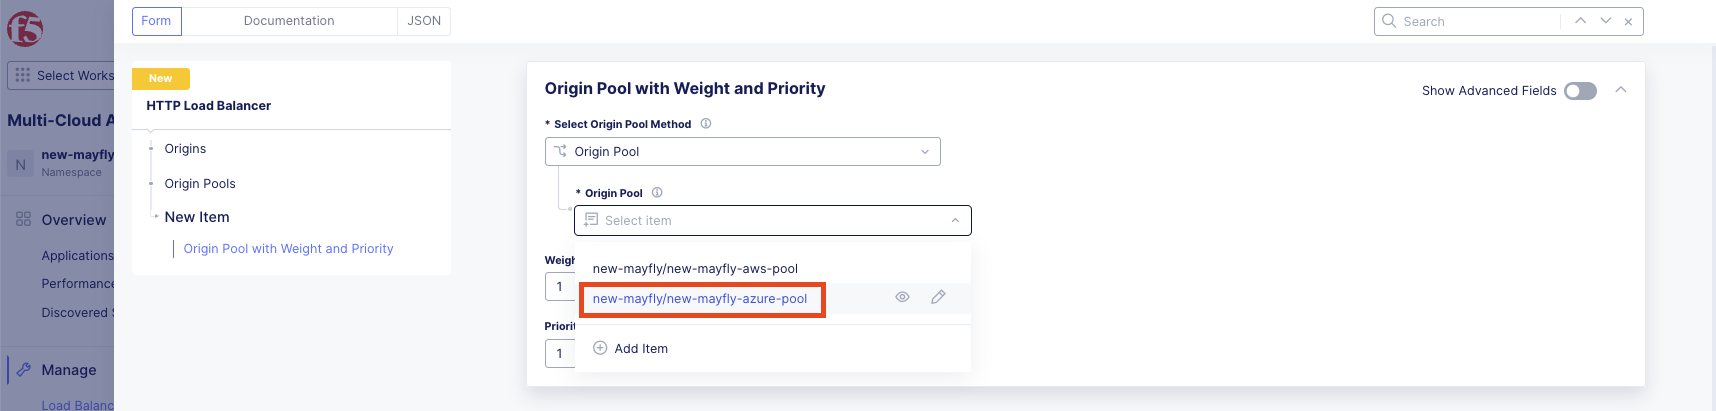
Configure Origin Pools:
Under Origin Pools, click Add Item.
Select your Azure pool: <your-namespace>-azure-pool
Click Apply.
Configure VIP Advertisement:
Scroll all the way down to Other Settings section.
Under VIP Advertisement, click the dropdown and select Custom.
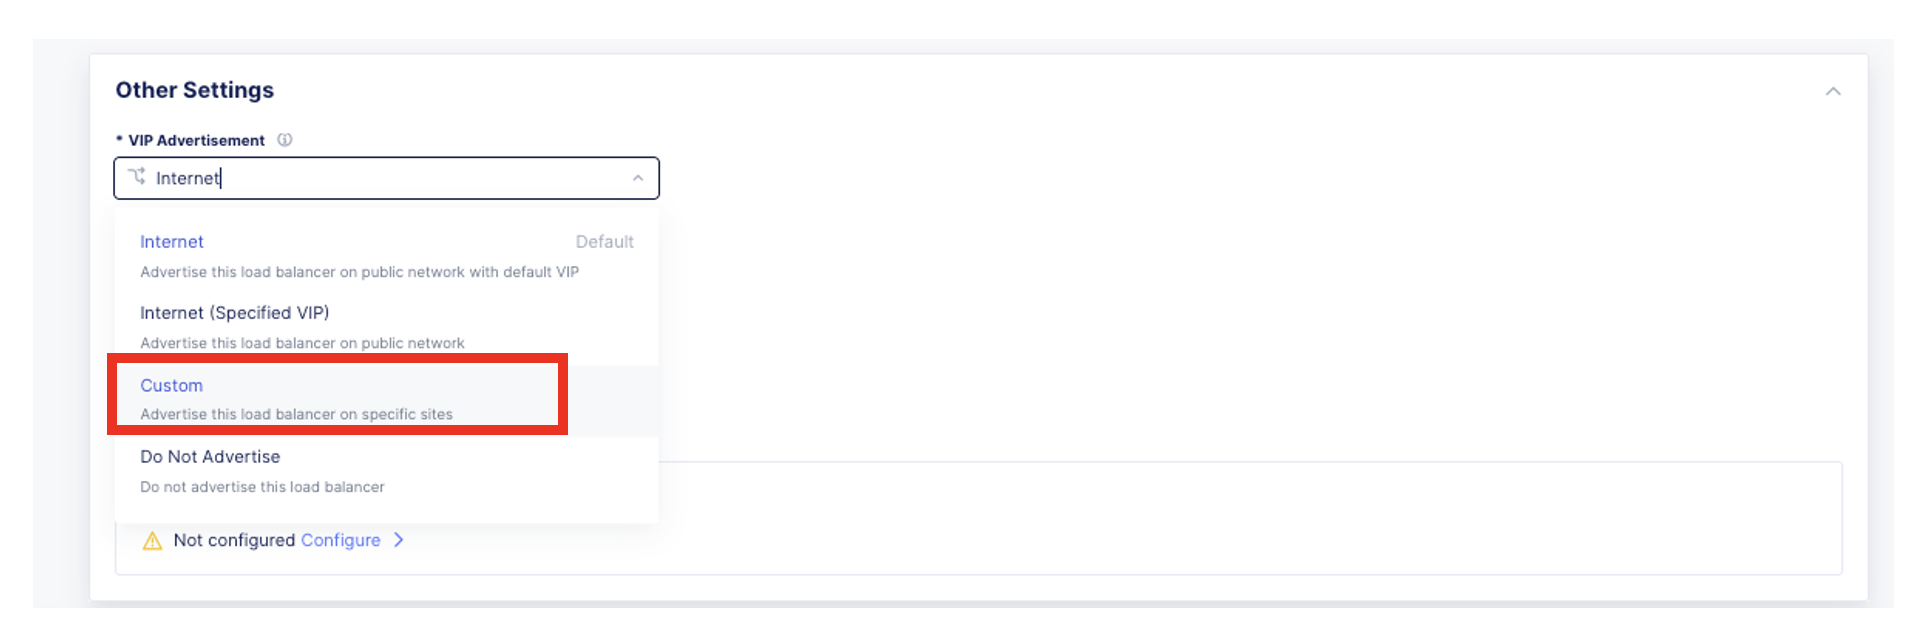
Important
Unlike the previous lab where we used the default Internet (Regional Edges), this time we will advertise the VIP on your Data Center CE to create an internal load balancer.
Click Configure.

Click Add Item.
Configure the advertisement:
Variable
Value
Select Where to Advertise
Site
Site Network
Outside Network
Site Reference
system/<your-namespace>-site
TCP Listen Port Choice
TCP Listen Port
TCP Listen Port
80
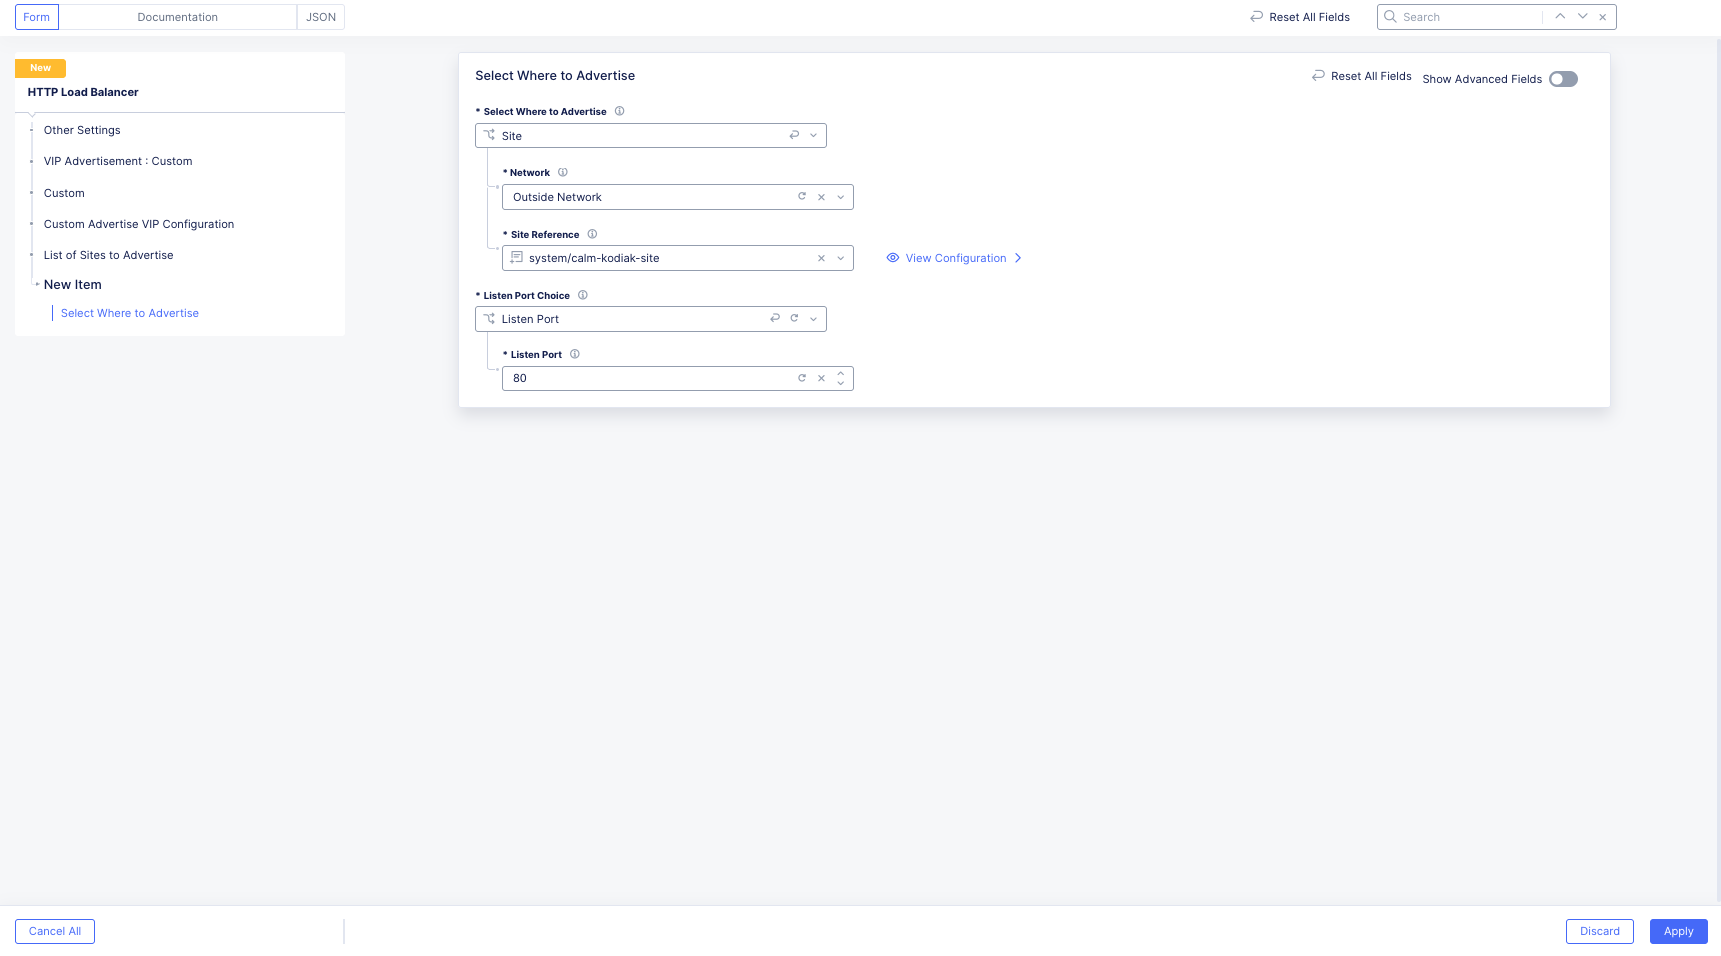
Click Apply, Apply, and then Add HTTP Load Balancer.
Task 3: Test Internal Load Balancer
Now let’s test the internal load balancer you just created.
From your UDF environment, click on Access >> Web Shell on the Ubuntu Client.
Test without domain name:
curl –head 10.1.1.5

You will receive a 404 Not Found error.
Tip
HTTP load balancers in F5 Distributed Cloud enforce domain name matching. Without the correct domain in the request, the load balancer will not respond.
Test with domain name resolution:
curl –head http://<your-namespace>-backend-vip-to-azure.lab-mcn.f5demos.com –resolve <your-namespace>-backend-vip-to-azure.lab-mcn.f5demos.com:80:10.1.1.5
You should now receive a 200 OK response!

To see the full HTML response, run the command without the –head flag:
curl http://<your-namespace>-backend-vip-to-azure.lab-mcn.f5demos.com –resolve <your-namespace>-backend-vip-to-azure.lab-mcn.f5demos.com:80:10.1.1.5

Task 4: Create Origin Pool for AWS Diagnostic Tool
Narrative Update:
ACME Corp has an urgent requirement: the AWS frontend needs to connect to the Azure frontend privately over port 80. To test this, you will use a diagnostic tool running on the AWS workload.
Navigate to Multi-Cloud App Connect >> Manage >> Load Balancers >> Origin Pools.
Click Add Origin Pool.
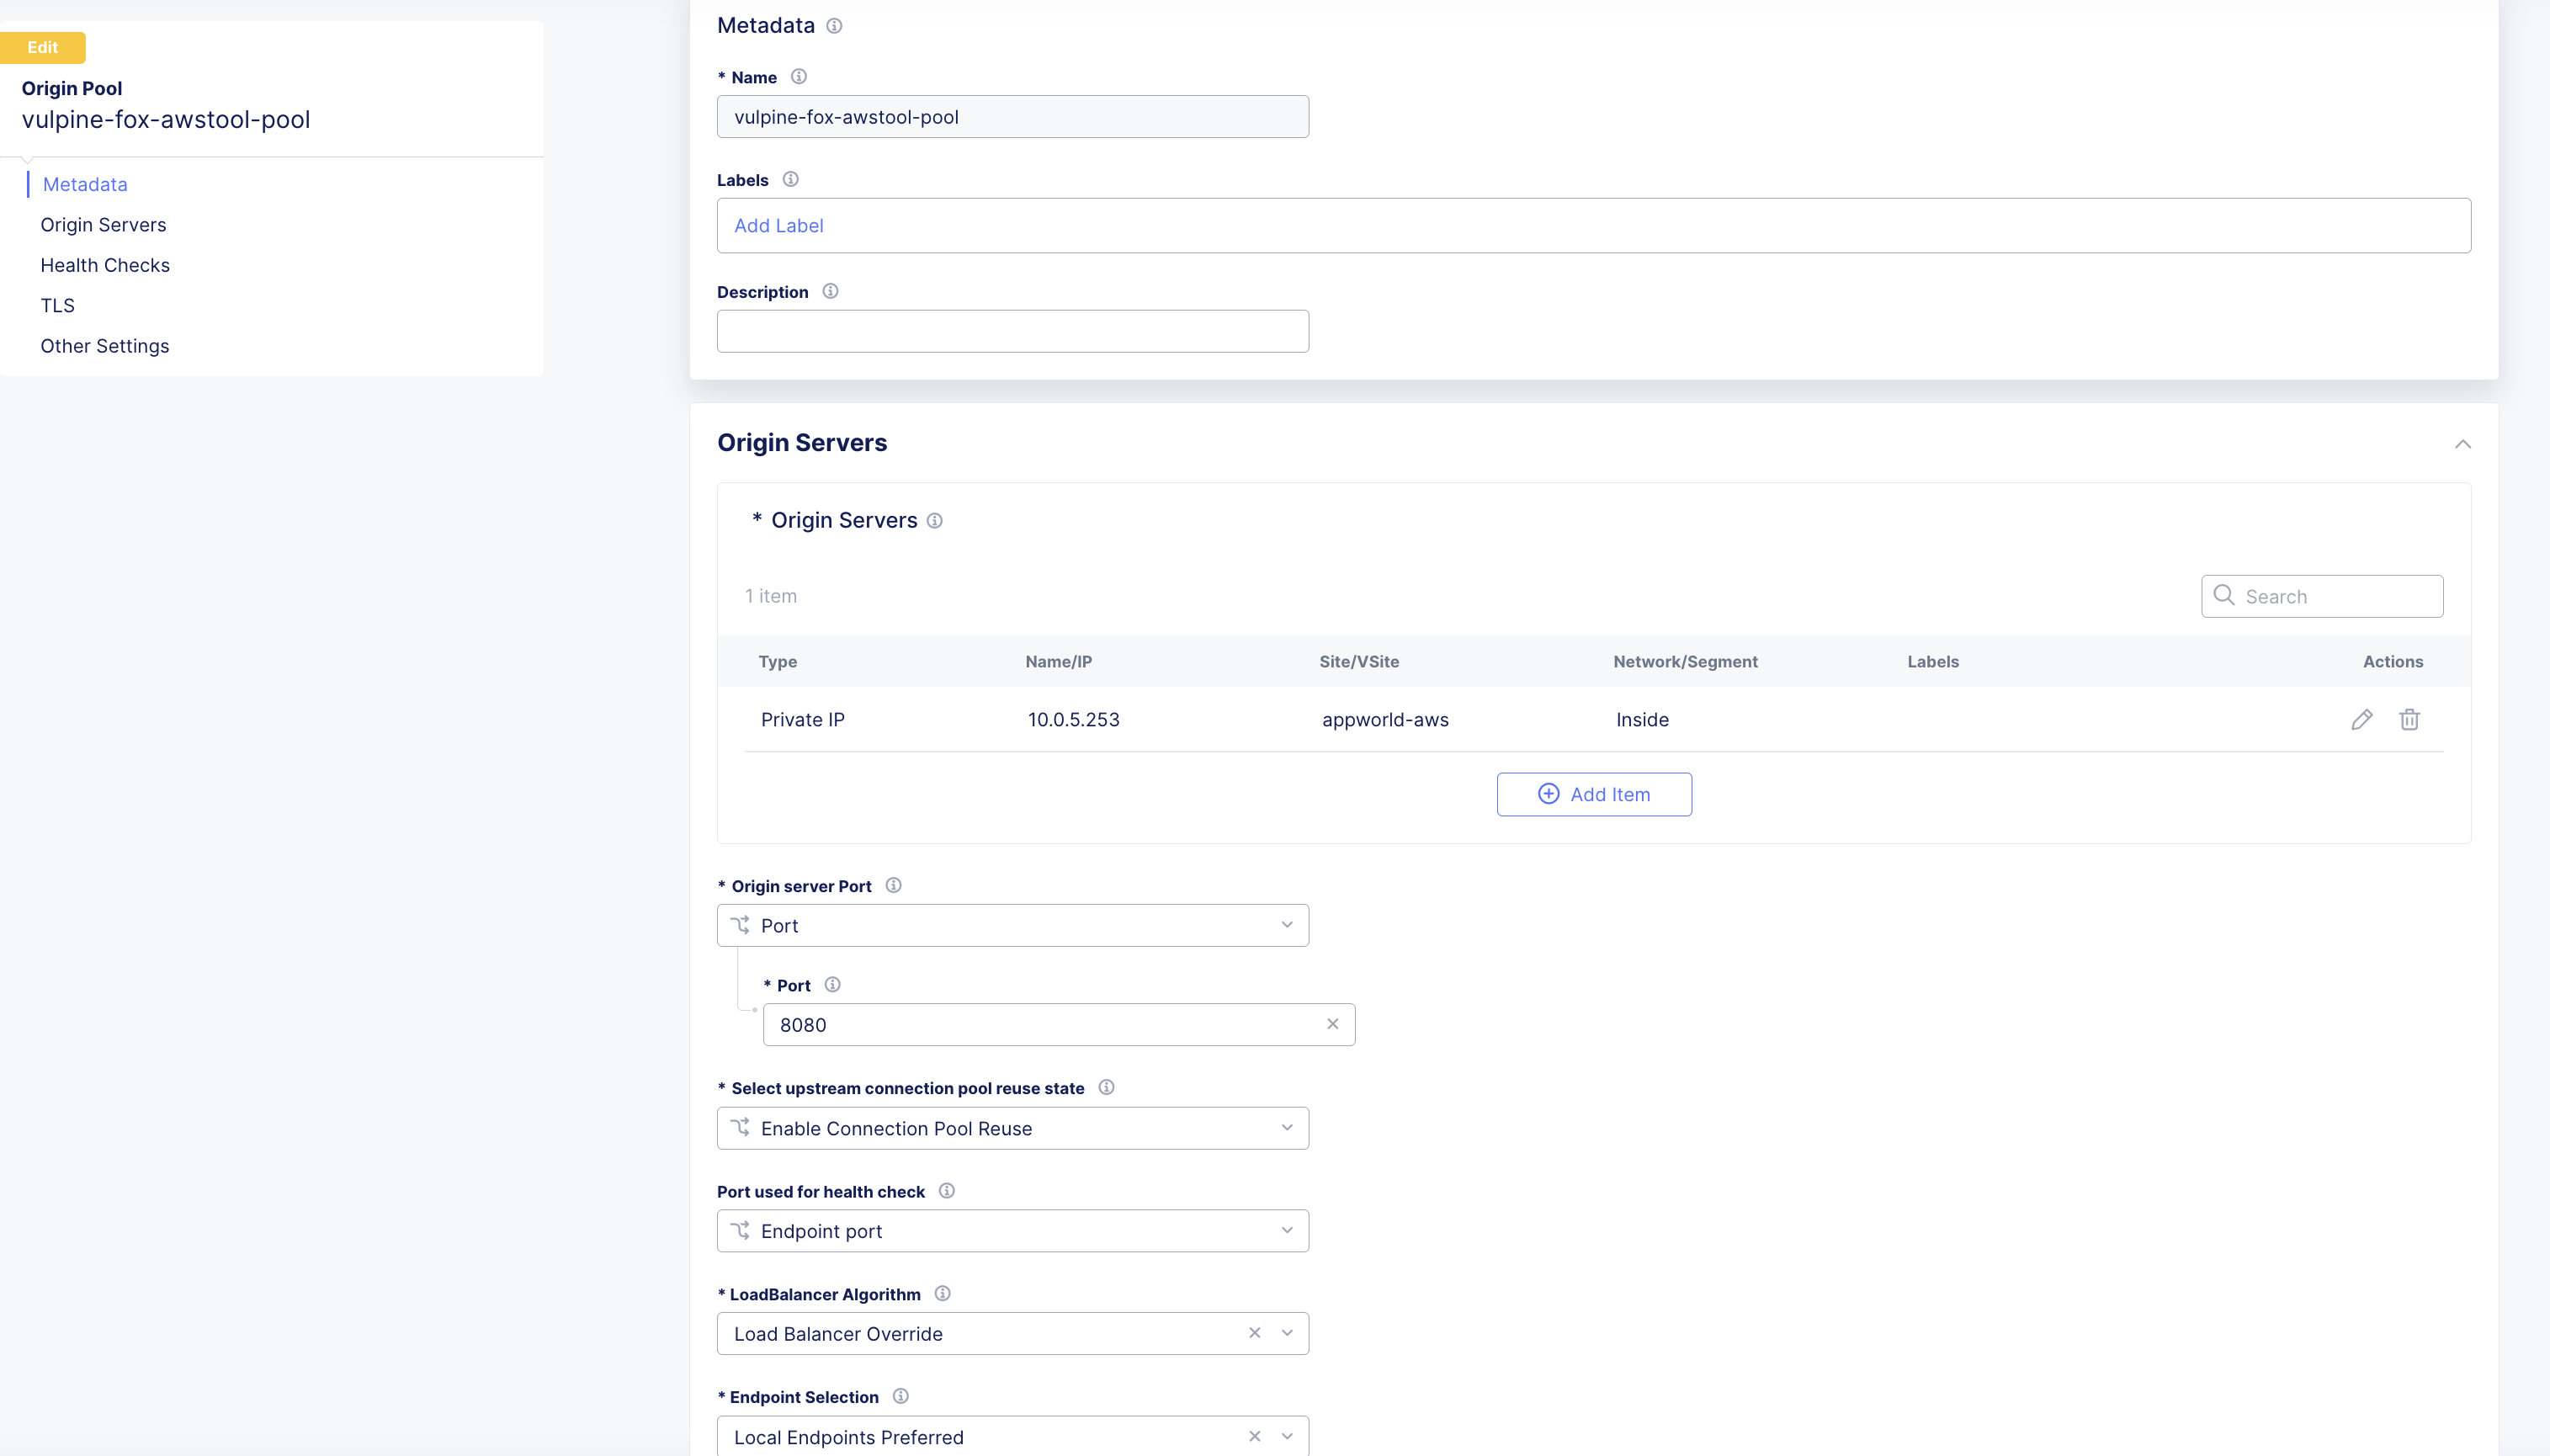
Configure the origin pool:
Variable
Value
Name
<your-namespace>-awstool-pool
Origin Server Port
8080
Configure Origin Servers:
Under Origin Servers, click Add Item.
Configure the origin server:
Variable
Value
Select Type of Origin Server
IP address of Origin Server on given Sites
IP
10.0.5.253
Site or Virtual Site
Site
Site
system/appworld-aws
Select Network on the site
Inside Network
Click Apply and then Add Origin Pool.
Task 5: Create HTTP Load Balancer for Diagnostic Tool
Navigate to Manage >> Load Balancers >> HTTP Load Balancers.
Click Add HTTP Load Balancer.
Configure the load balancer:
Variable
Value
Name
<your-namespace>-awstool
Domains
<your-namespace>-awstool.lab-mcn.f5demos.com
Load Balancer Type
HTTP
Automatically Manage DNS Records
Checked (Important!)
HTTP Port
80
Under Origin Pools, click Add Item.
Select <your-namespace>-awstool-pool and click Apply.
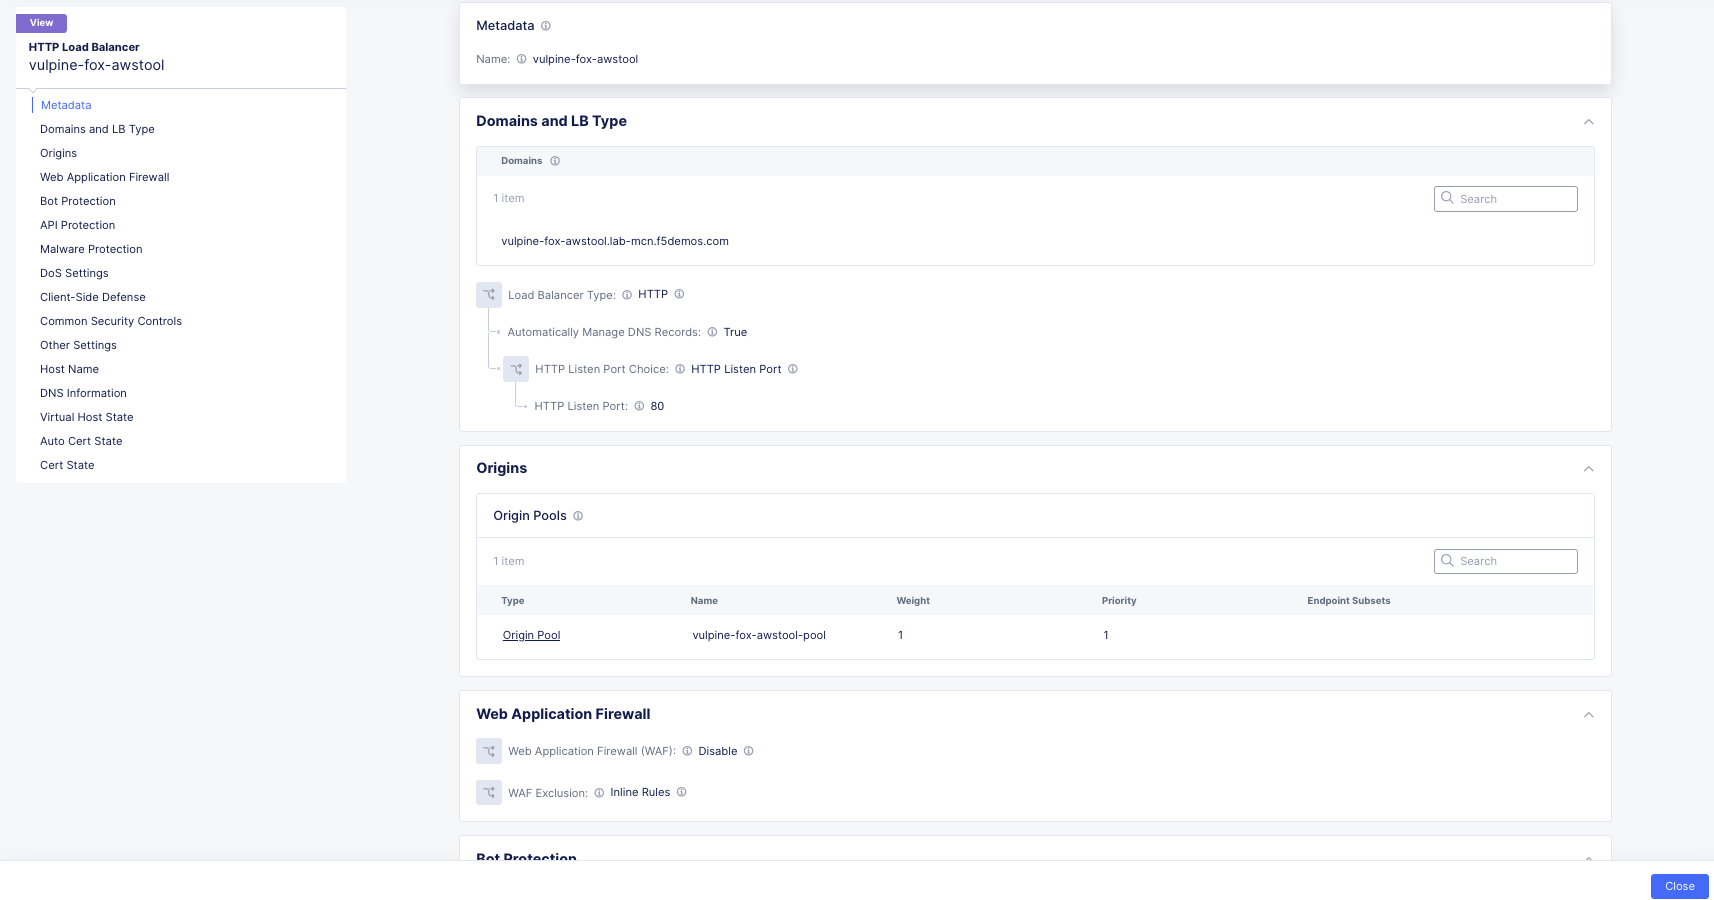
Click Add HTTP Load Balancer.
Open a new browser tab and navigate to:
http://<your-namespace>-awstool.lab-mcn.f5demos.com
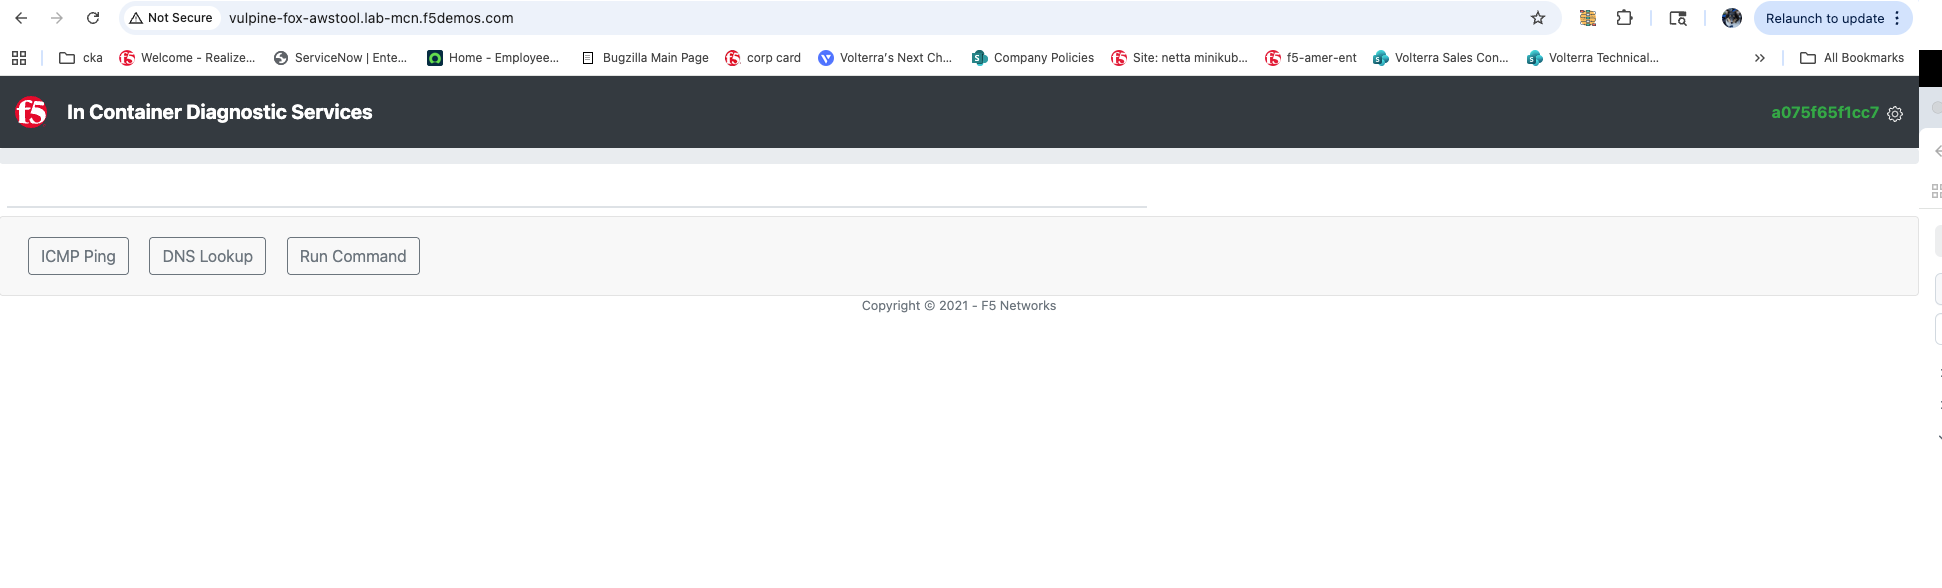
Note
If you cannot access the tool site, please see a lab assistant.
Task 6: Create AWS to Azure Load Balancer
Now you’ll create an internal load balancer in AWS that connects to Azure.
Navigate to Manage >> Load Balancers >> HTTP Load Balancers.
Click Add HTTP Load Balancer.
Configure the load balancer:
Variable
Value
Name
<your-namespace>-aws-to-azure-lb
Domains
<your-namespace>-aws-to-azure-lb.lab-mcn.f5demos.com
Load Balancer Type
HTTP
Automatically Manage DNS Records
Unchecked
HTTP Port
80
Under Origin Pools, click Add Item.
Select <your-namespace>-azure-pool and click Apply.
Configure VIP Advertisement:
Scroll all the way down to VIP Advertisement and select Custom.
Click Configure.
Click Add Item.
Configure the advertisement:
Variable
Value
Select Where to Advertise
Site
Site Network
Inside
Site Reference
system/appworld-aws
TCP Listen Port Choice
TCP Listen Port
TCP Listen Port
80
Note
The AWS CE node has two interfaces (Inside/Outside). We’re advertising on the Inside interface to create an internal load balancer.
Click Apply, Apply, and then Add HTTP Load Balancer.
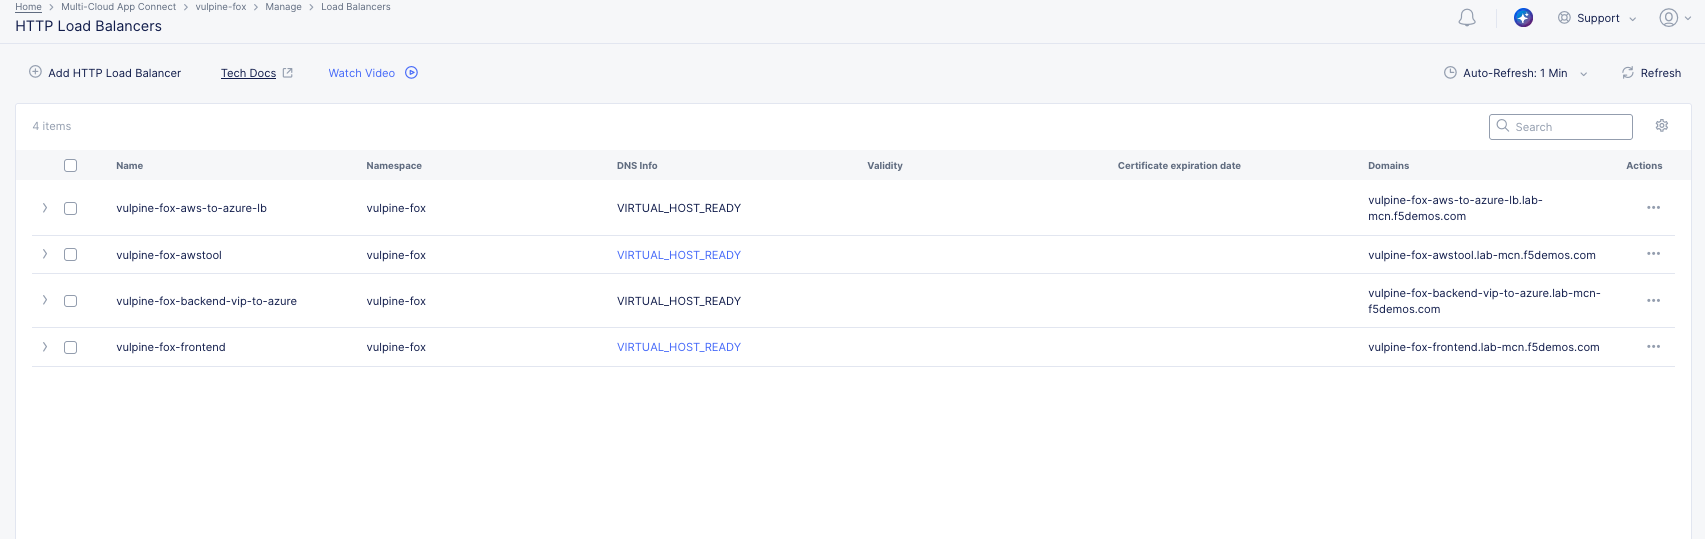
Verify you now have 4 HTTP load balancers for your namespace.
Task 7: Test AWS to Azure Connectivity
Let’s test the connectivity between AWS and Azure through the internal load balancer.
First, verify the inside interface IP of the AWS CE node.
Navigate to Multi-Cloud Network Connect >> Manage >> Site Management >> Secure Mesh Sites v2.
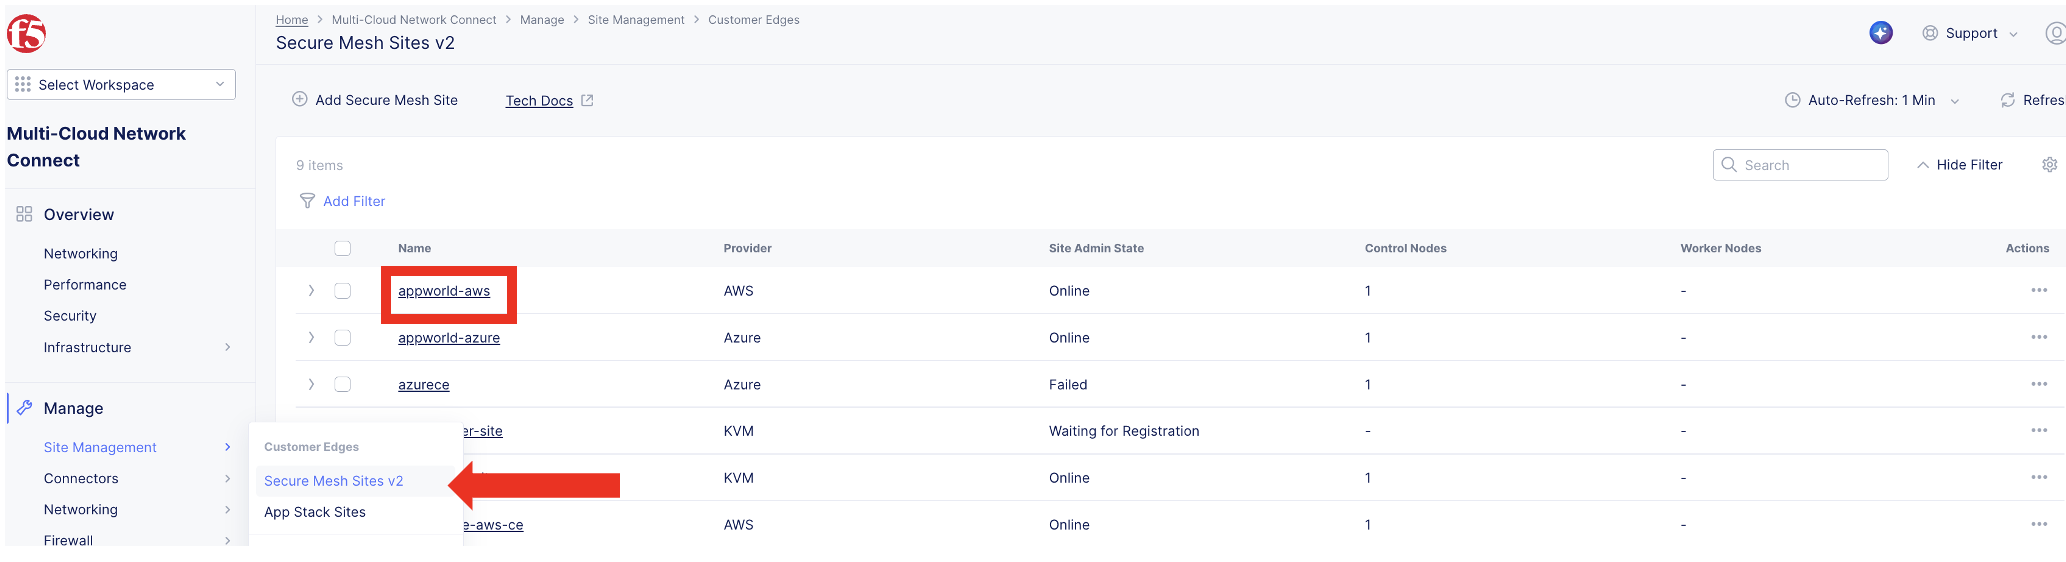
Click on appworld-aws.
Navigate to the Infrastructure tab and note the inside interface IP address.
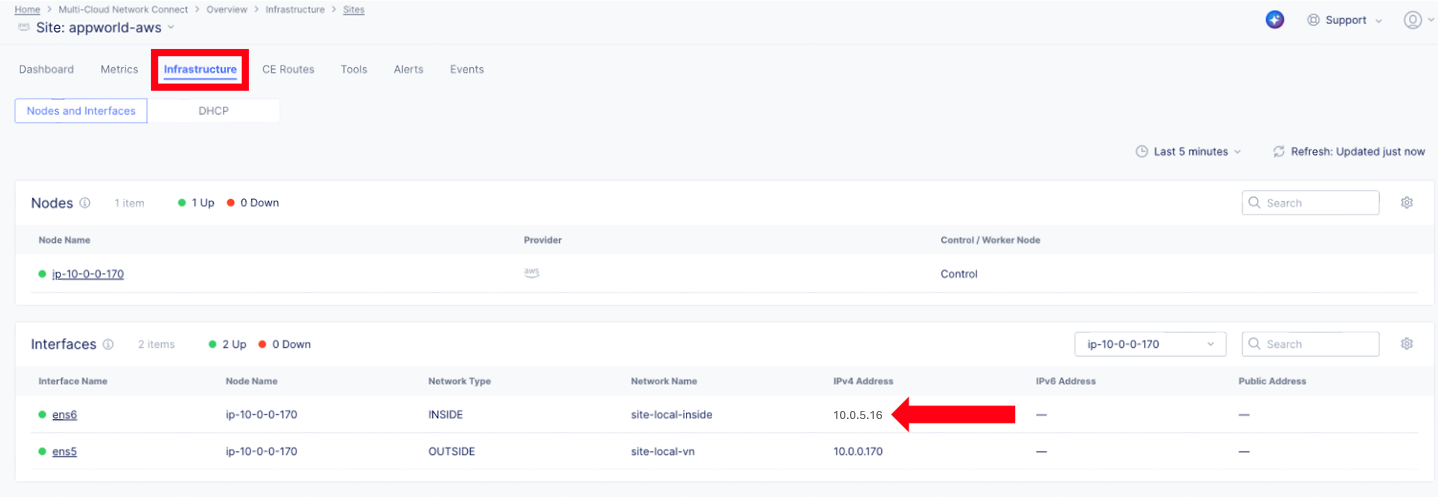
Note
In this example, the inside interface IP is 10.0.5.16. Your IP may differ.
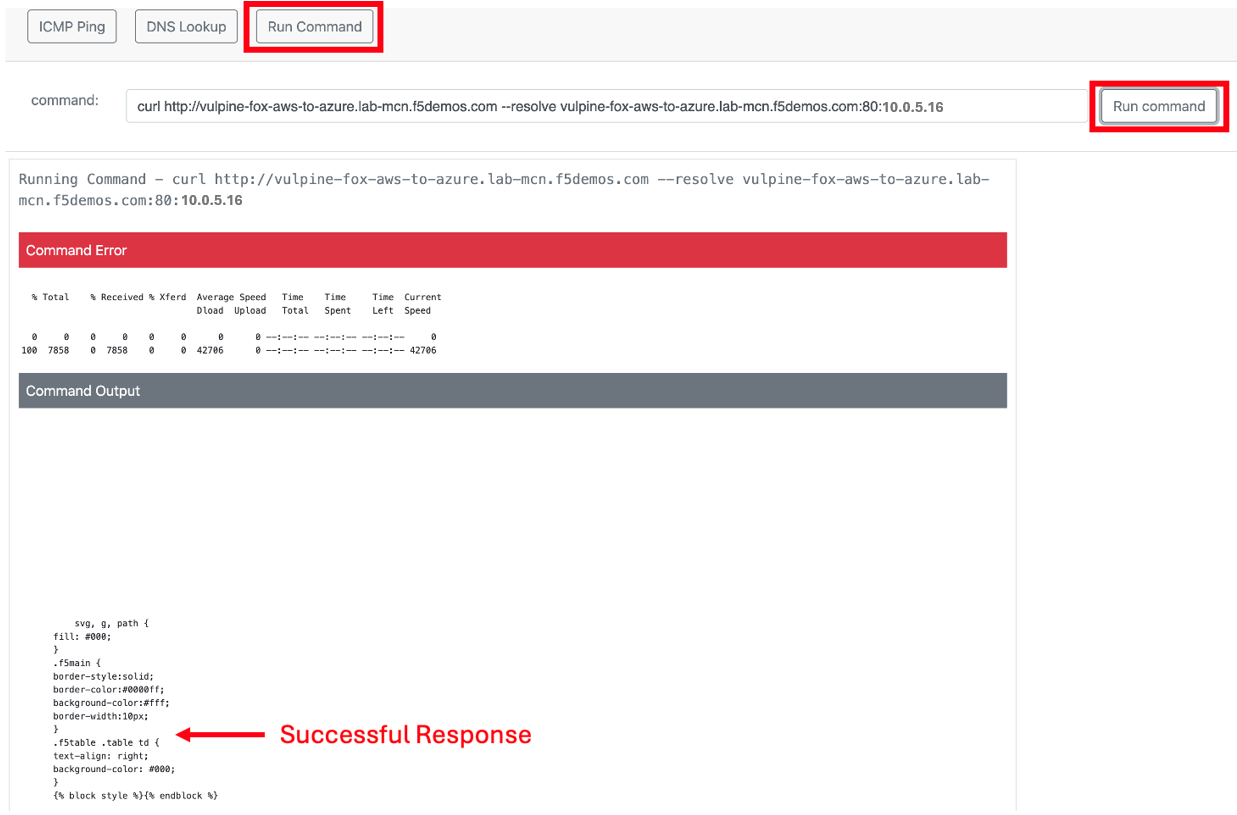
Go to the diagnostic tool: http://<your-namespace>-awstool.lab-mcn.f5demos.com
Click Run Command and paste the following (remember you IP may differ):
curl http://<your-namespace>-aws-to-azure-lb.lab-mcn.f5demos.com –resolve <your-namespace>-aws-to-azure-lb.lab-mcn.f5demos.com:80:10.0.5.16
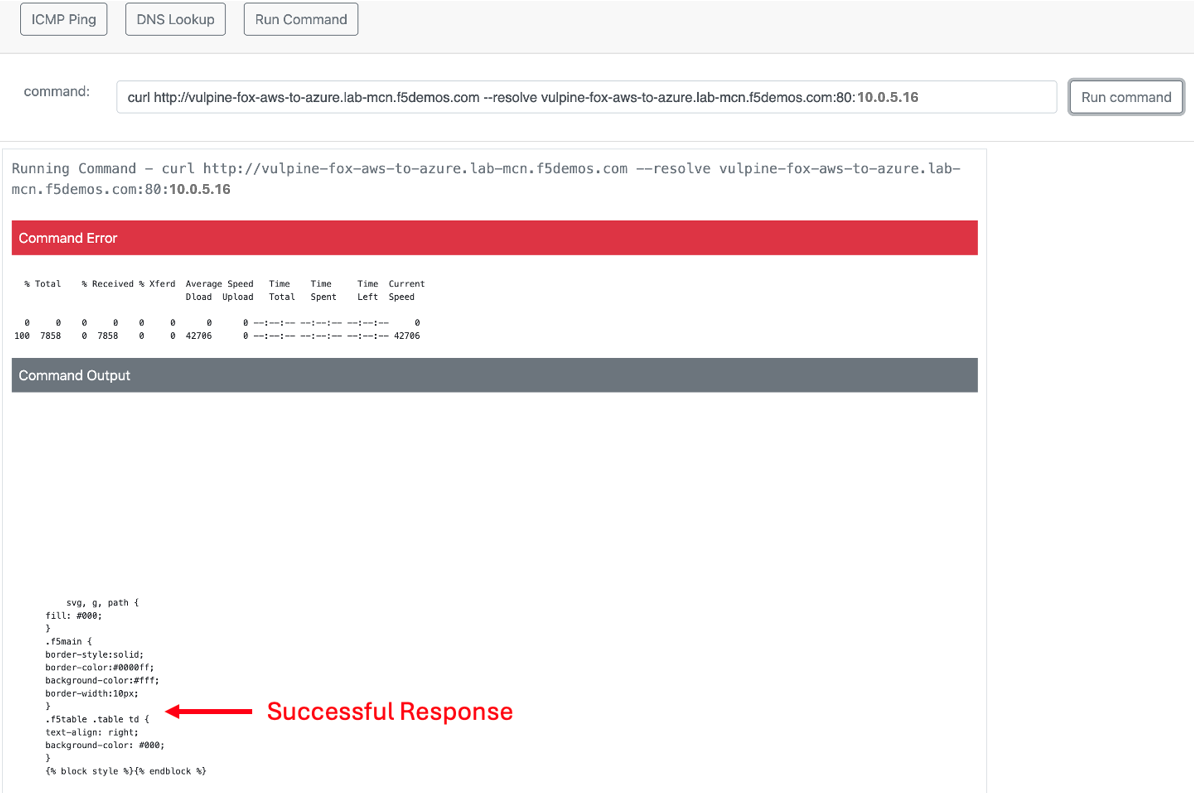
You should see a successful response!
Test again with the –head flag:
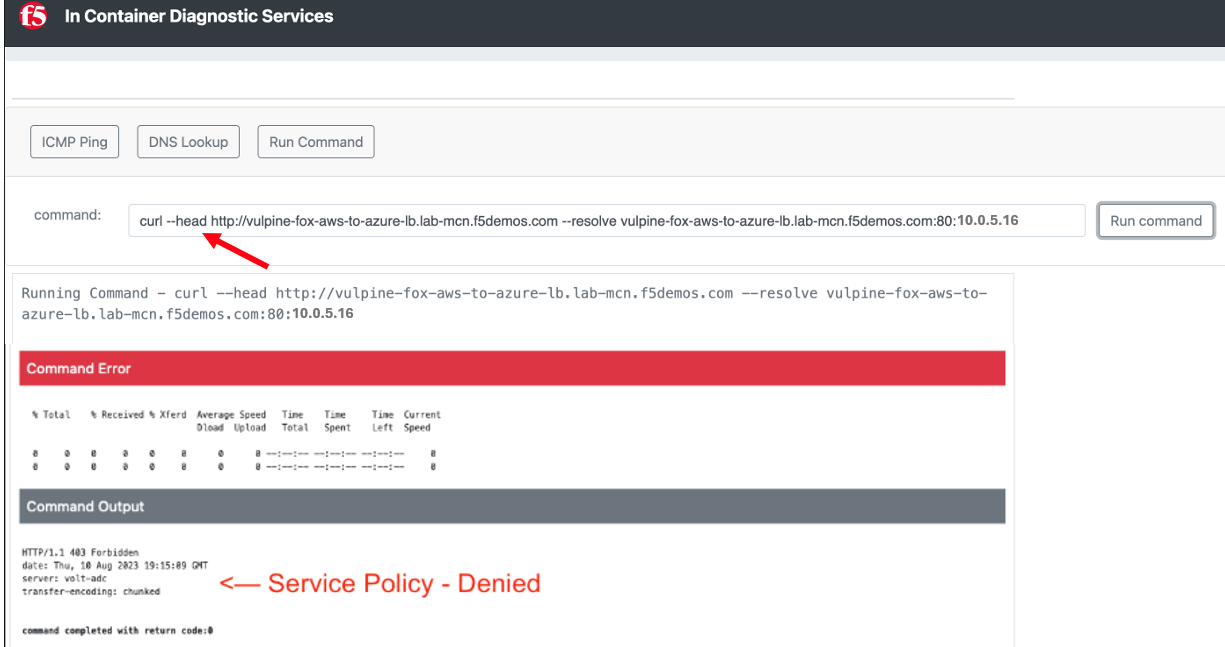
curl –head http://<your-namespace>-aws-to-azure-lb.lab-mcn.f5demos.com –resolve <your-namespace>-aws-to-azure-lb.lab-mcn.f5demos.com:80:10.0.5.16

Tip
You now have full proxy connectivity between IP-overlapped AWS and Azure resources over a private encrypted tunnel!
Task 8: Adding Security
You just configured an App Connect Proxy listening on port 80 of the Inside interface of the AWS XC Node. Since the App Connect Proxy is default-deny and only accepts traffic on the configured load balancer port with the appropriate Layer 7 Domain information, we can rest assured that no other ports will be permitted.
The second request to ensure that the pretend API running on port 80 in Azure is Read Only or R/O, can easily be solved with a Service Policy. For ease of demonstration we will make use of two HTTP methods and pretend that HEAD is R/W and of course GET is natively R/O.
Head is one of many HTTP methods used to interact with API’s amongst other things. Some other common ones are GET, POST and PUT.
Technically speaking, The HEAD method is identical to GET except that the server MUST NOT return a message-body in the response.
Note
In our Lab we are just pretending that HEAD is R/W.
What if we we didn’t want to allow HEAD or only allow certain HTTP methods between these two workloads?
In general, for any of our HTTP Load Balancers, what if we wanted to block a geolocation? What if we wanted to allow some IP’s and disallow others? How about file type enforcements?
Service Policies to the Rescue!
While Service Policies can do many things, we will go through a quick exercise to simply block the HTTP Method of HEAD for our AWS to Azure HTTP Load Balancer. This example could easily be expanded upon.
When you create a Service Policy it intrinsically contains a default deny. Therefore, our Service Policy will actually be a definition of what is allowed.
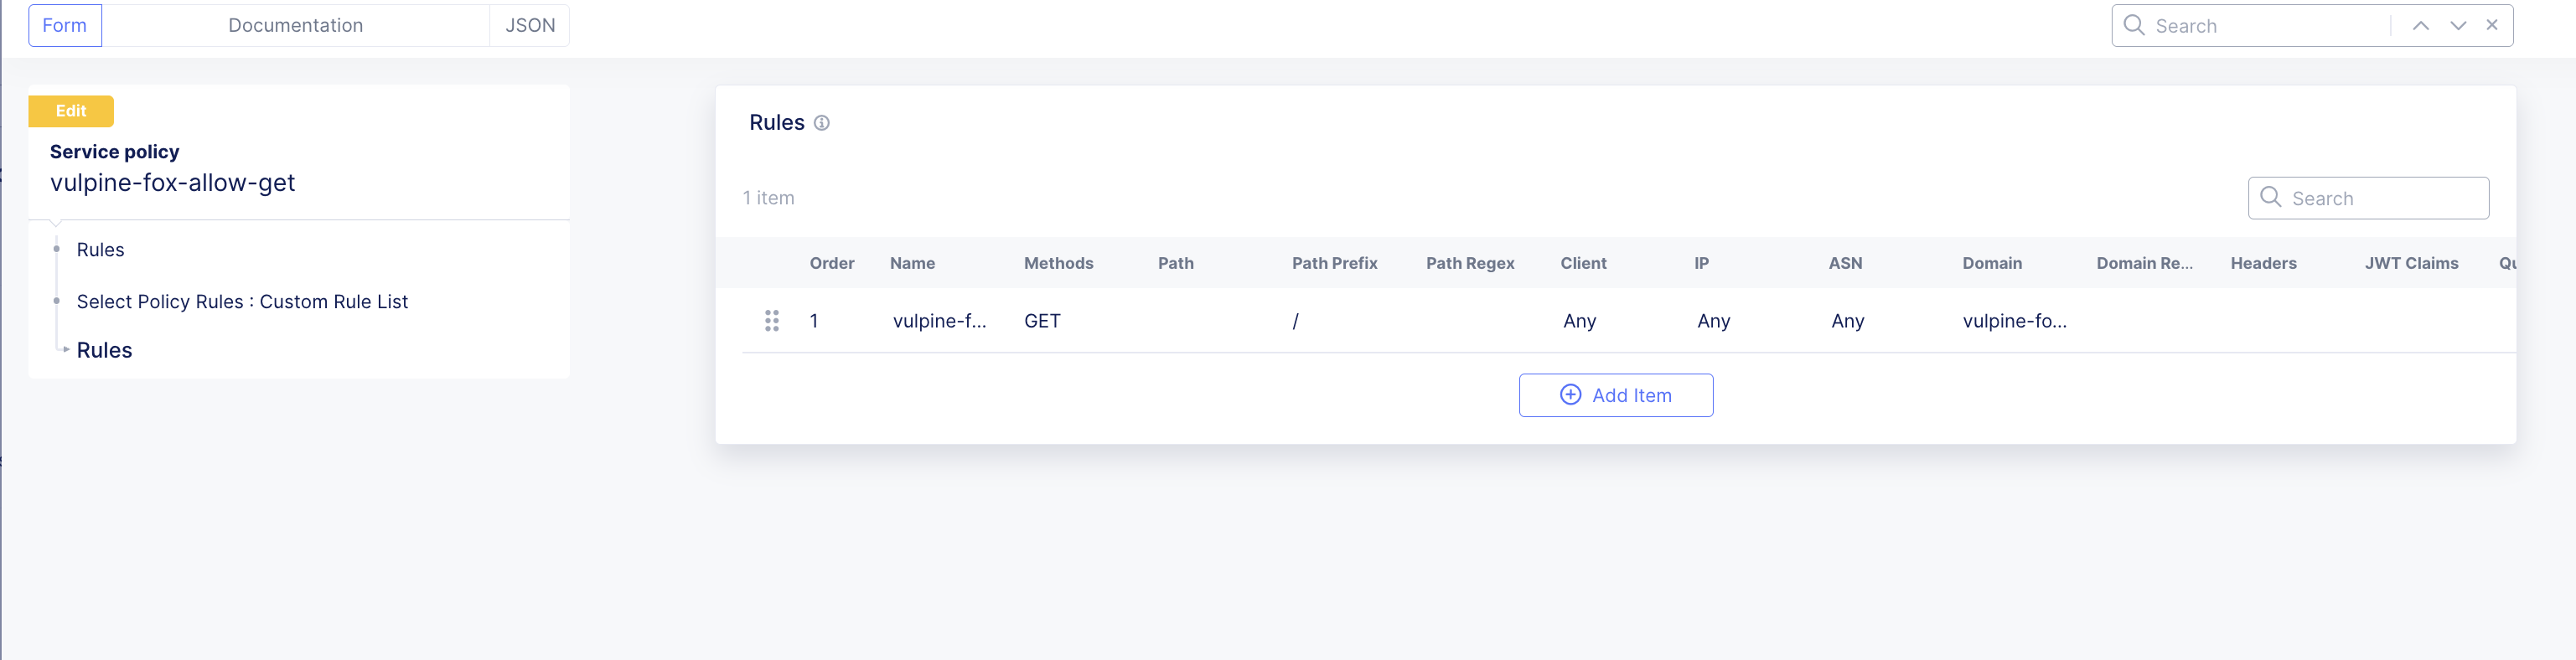
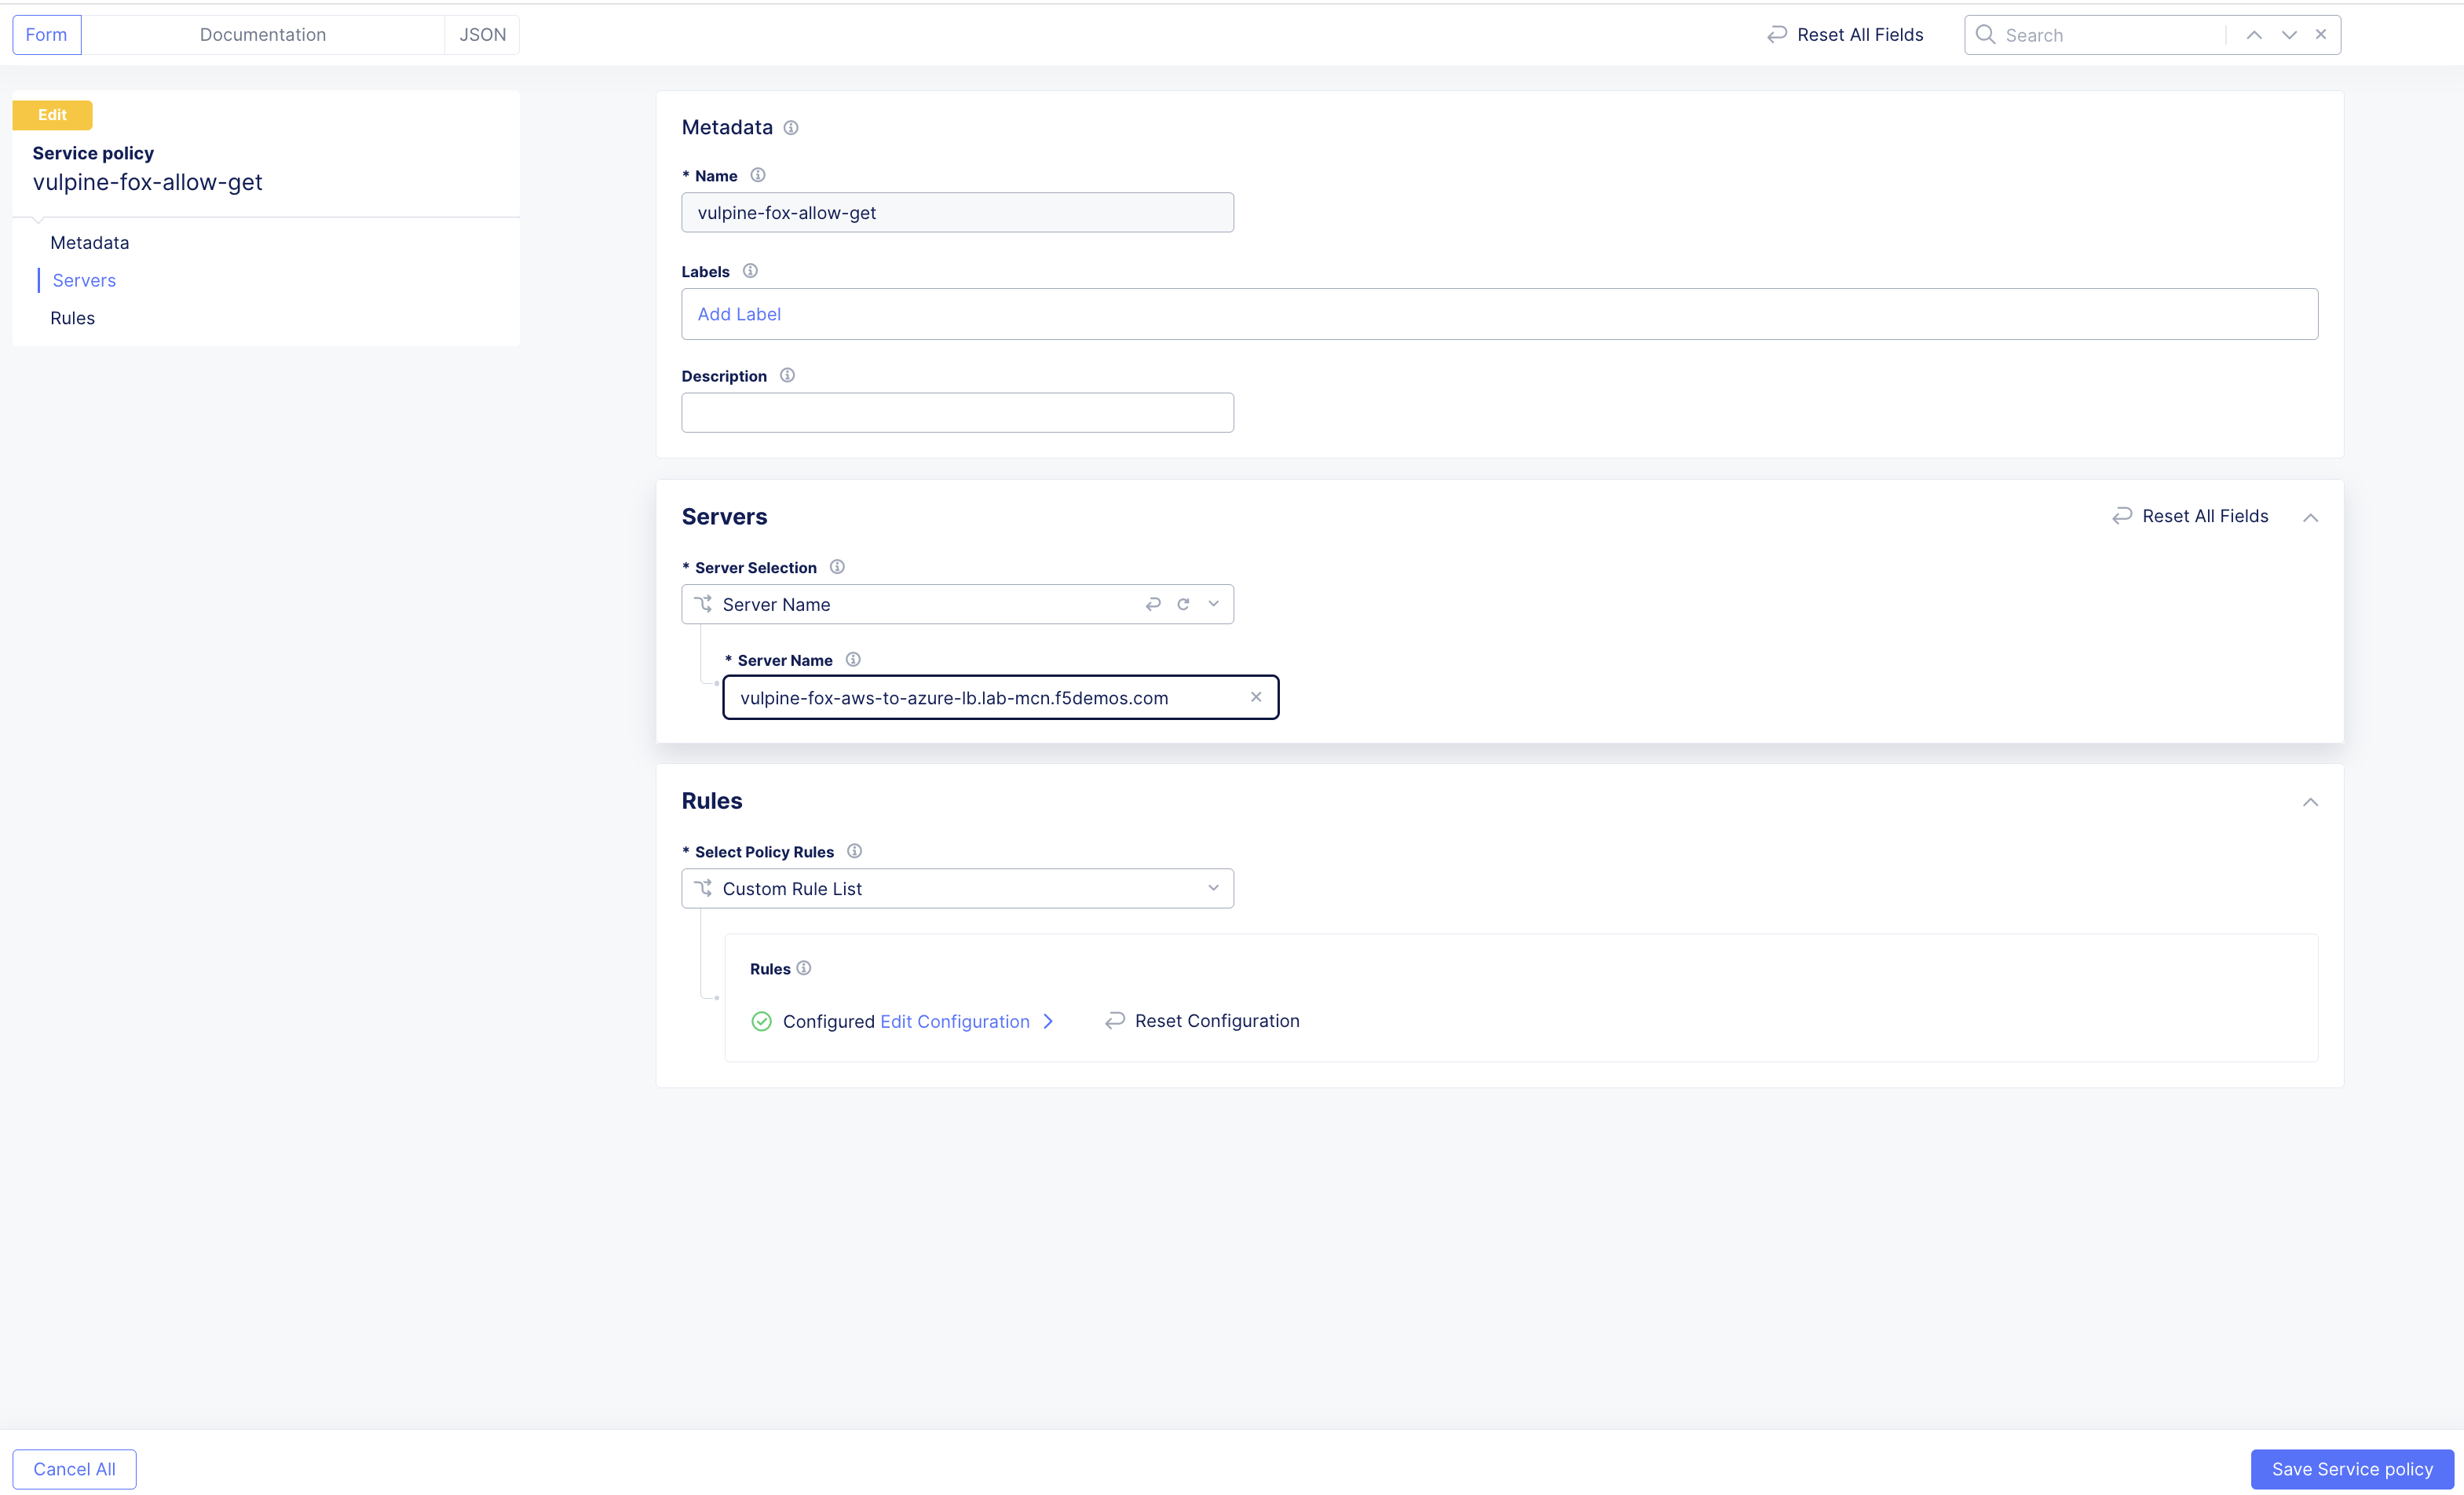
Back in XC Console, go to Multi-Cloud App Connect and from the Side menu under Security, click on Service Policies >> Service Policies and click the Add Service Policy button.
Variable |
Value |
|---|---|
Name |
<your-namespace>-allow-get-sp |
Server Selection |
Server Name |
Server Name |
<animal-name>-aws-to-azure-lb.lab-mcn.f5demos.com |
Select Policy Rules |
Custom Rule List |
Rules |
Configure, Click Add Item > See Below: |
Rules
Variable |
Value |
|---|---|
Name |
allow-get |
Action |
Allow |
Clients |
Any Client |
Servers |
Domain Matcher >> Exact Value >> <your-namespace>-aws-to-azure-lb.lab-mcn.f5demos.com |
HTTP Method/Method List |
Get |
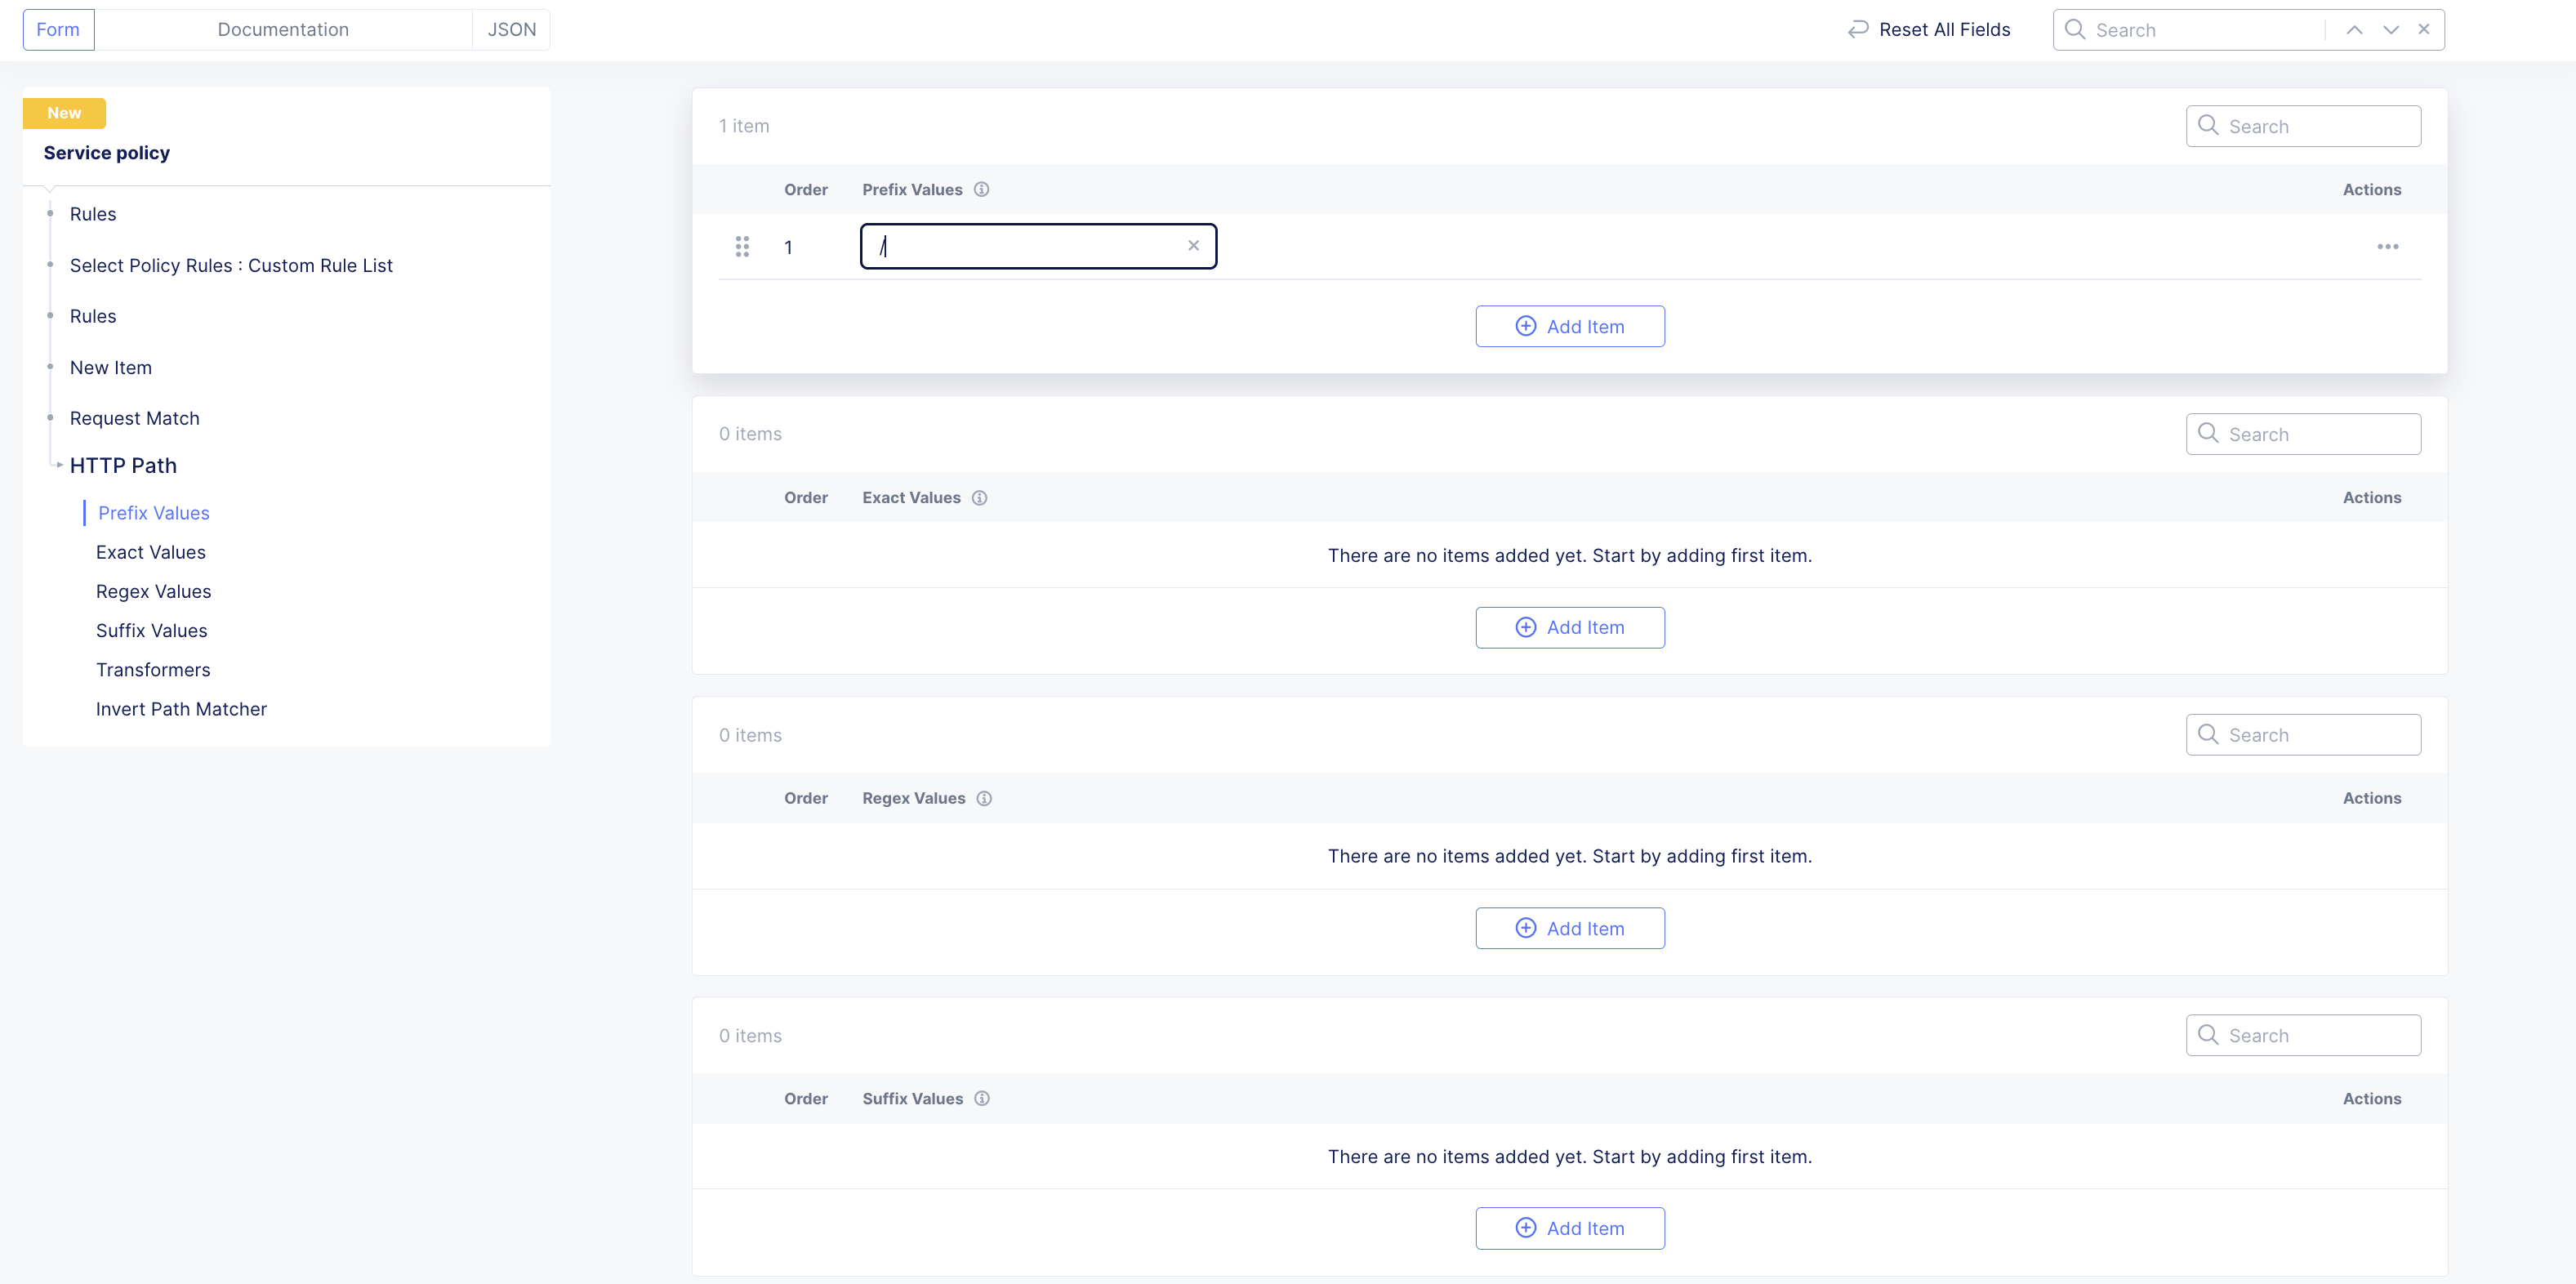
HTTP Path |
Configure >> Add Item add / under Prefix Values. |
Click Apply |
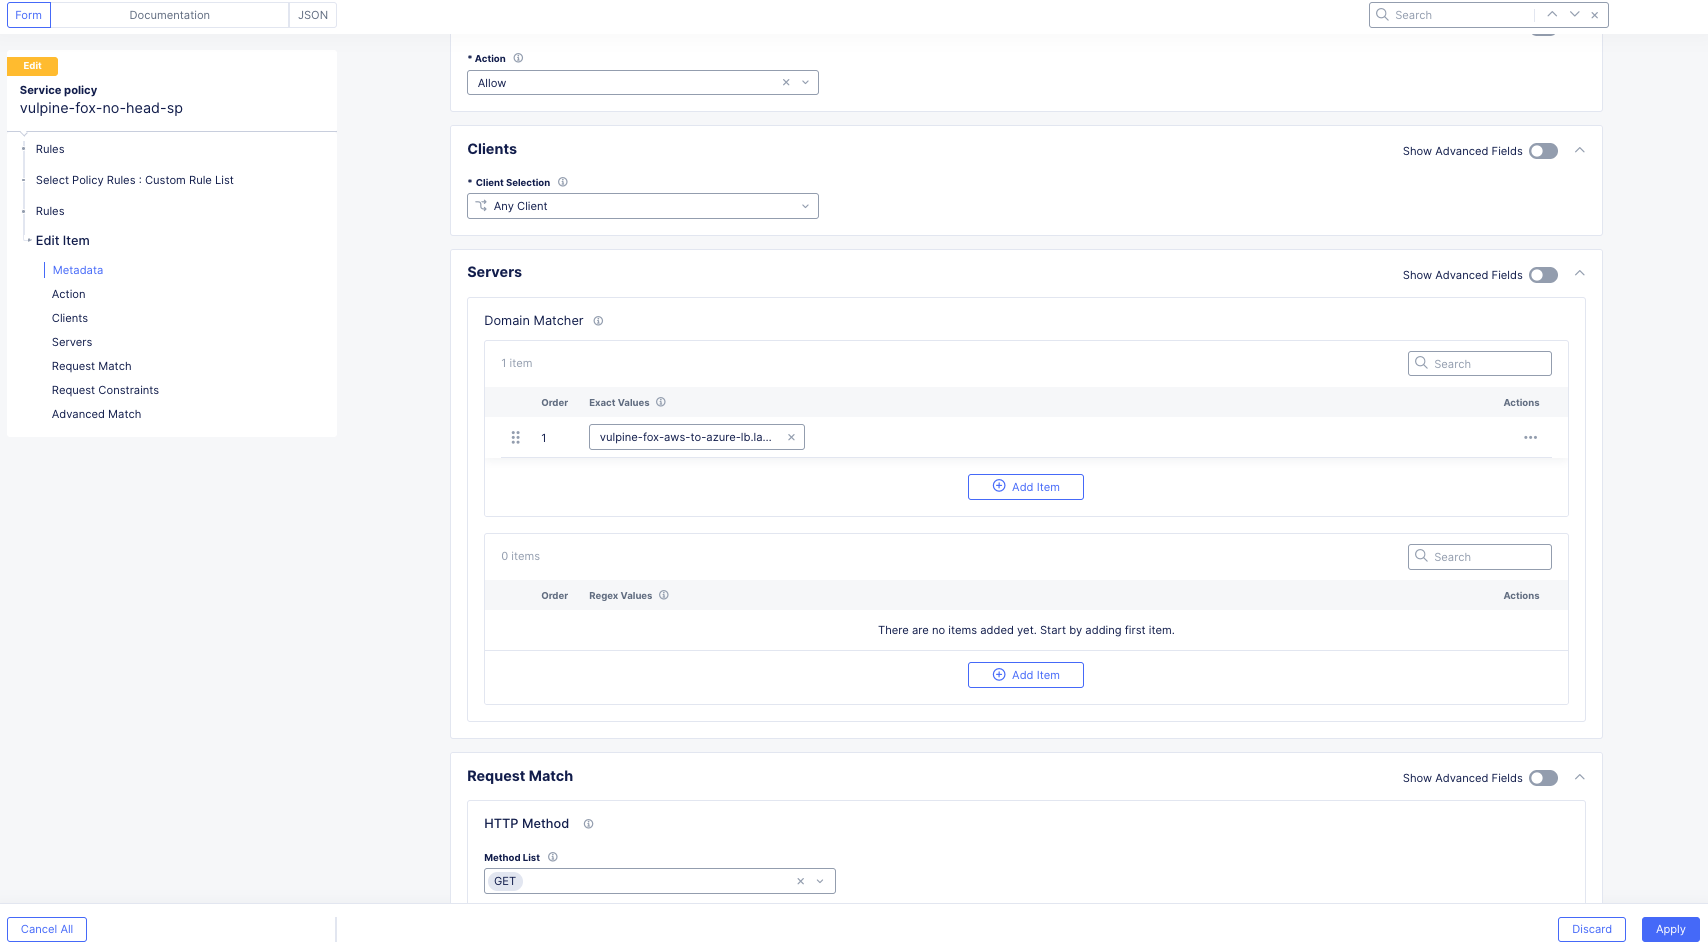
Scroll down and click Apply. |
Click Apply |
Click Add Service policy
Test Service Policy
If you don’t already have a tab open to the Diag tool, in your browser go to: http://<your-namespace>-awstool.lab-mcn.f5demos.com
Try your curl command again without the –head flag.:
curl http://<your-namespace>-aws-to-azure-lb.lab-mcn.f5demos.com --resolve <your-namespace>-aws-to-azure-lb.lab-mcn.f5demos.com:80:10.0.5.16
Now lets add the Service Policy to our LB and run the command again but insert the --head command.:
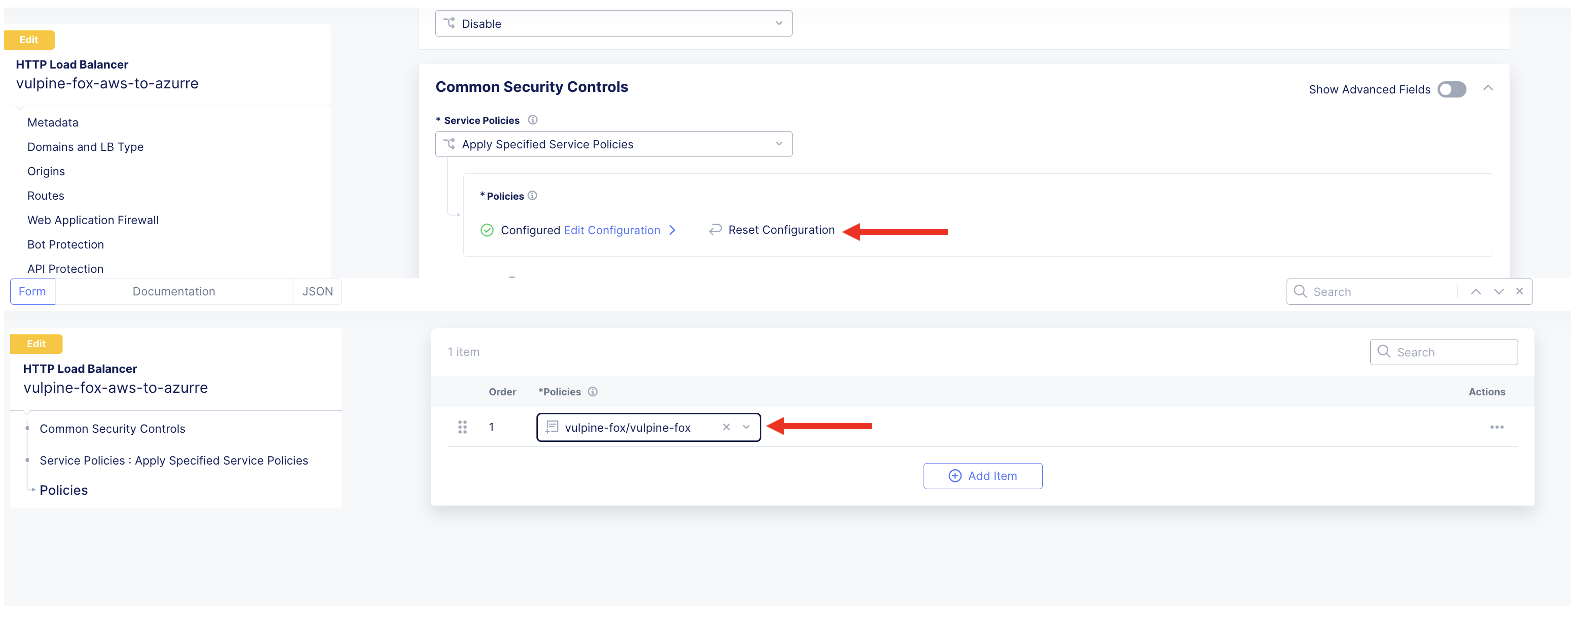
Goto Multi-Cloud App Connect >> Manage >> Load Balancers >> HTTP Load Balancers and click on the 3 dots to the right of the aws-to-azure Load Balancer. Click Edit Config in top right hand corner and scroll down to Common Security Controls and add the service policy by clicking Apply Specified Service Policies >> Configure >> Choose the allow get service policy >> Apply >> Save HTTP Load Balancer |
You have now successfully configured an application layer Service Policy that enforces HTTP methods.
Note
This is a primitive example of a much more powerful construct that can be used to enforce, secure and manipulate HTTP traffic much like iRules did on F5’s classic BIG-IP platform.
Review Service Policy Logs
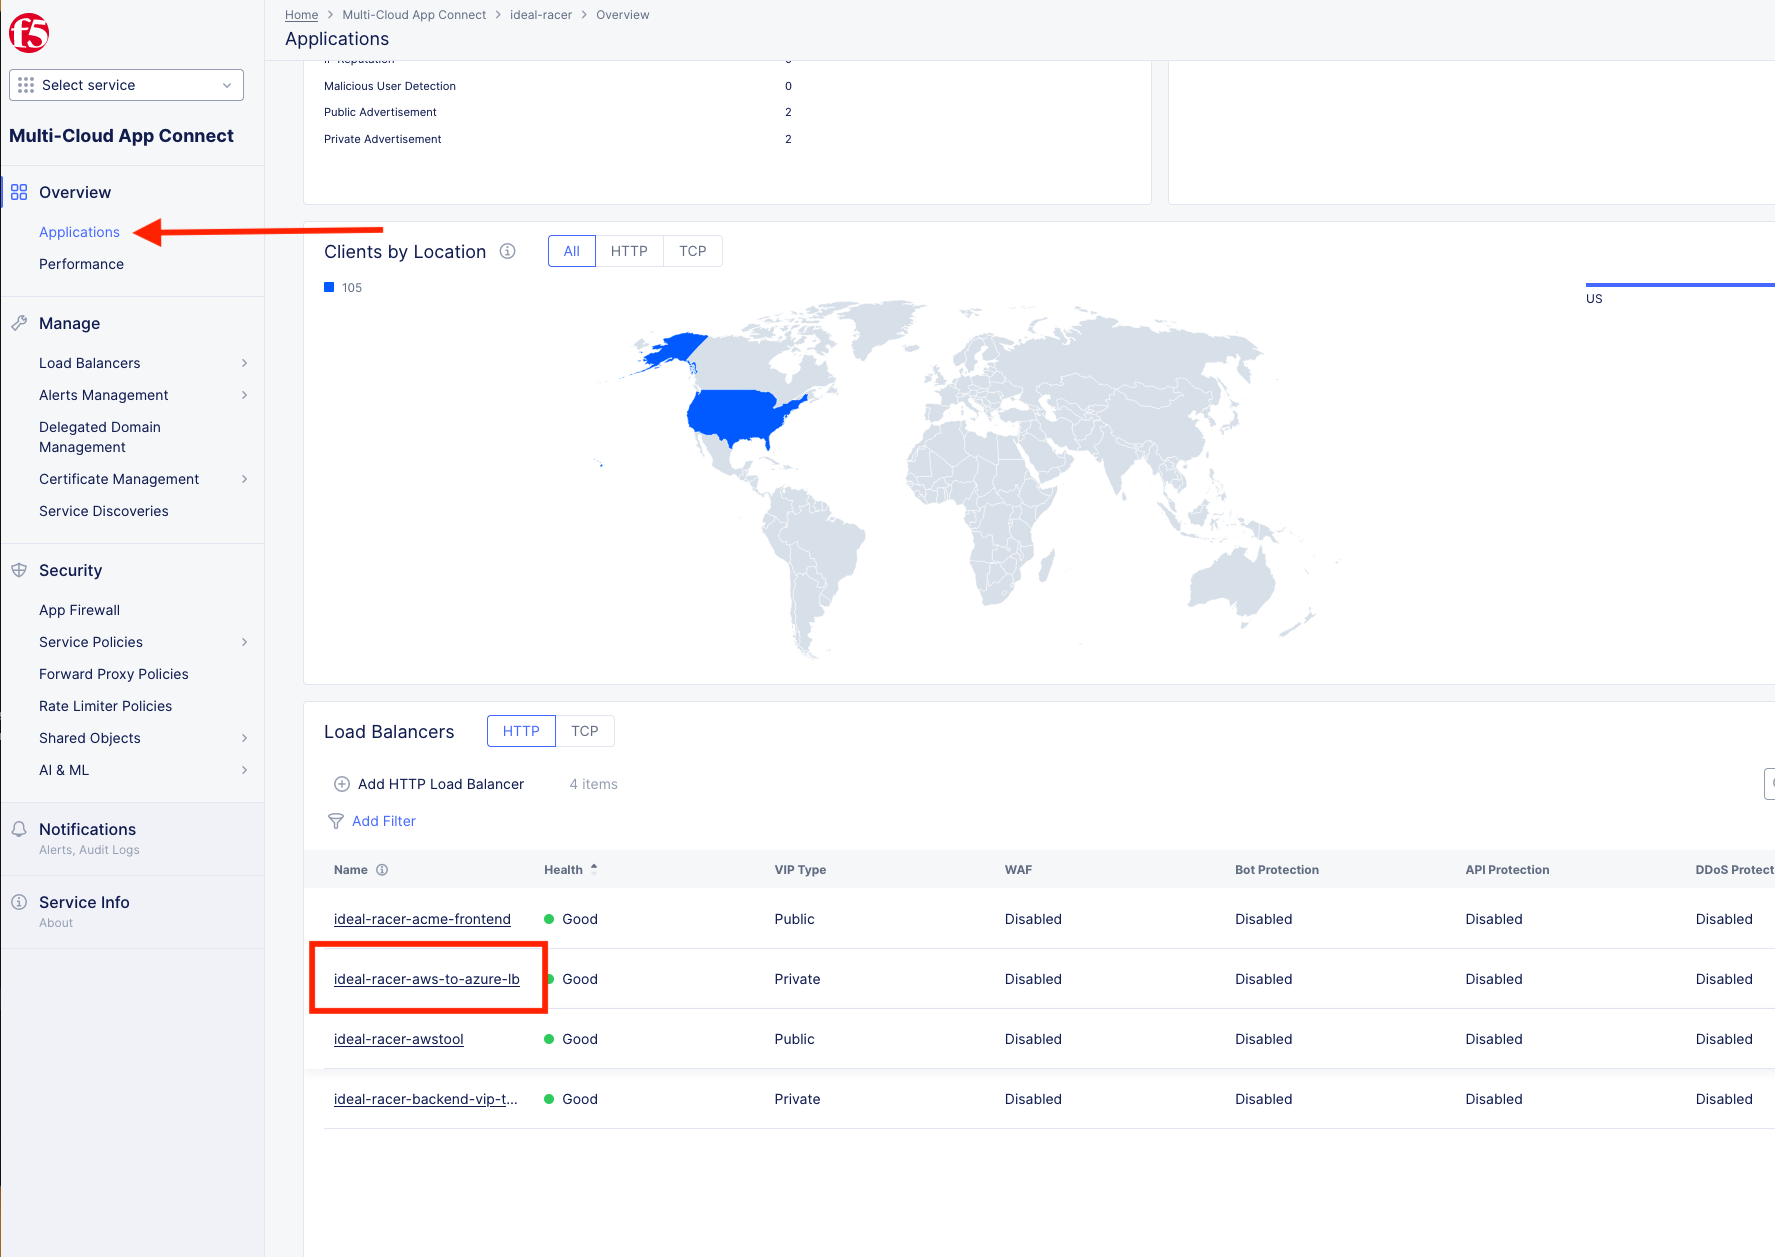
Back in XC Console, and from the Side menu under Overview, click on Applications and scroll down and click on your <your-namespace>-aws-to-azure-lb under Load Balancers.
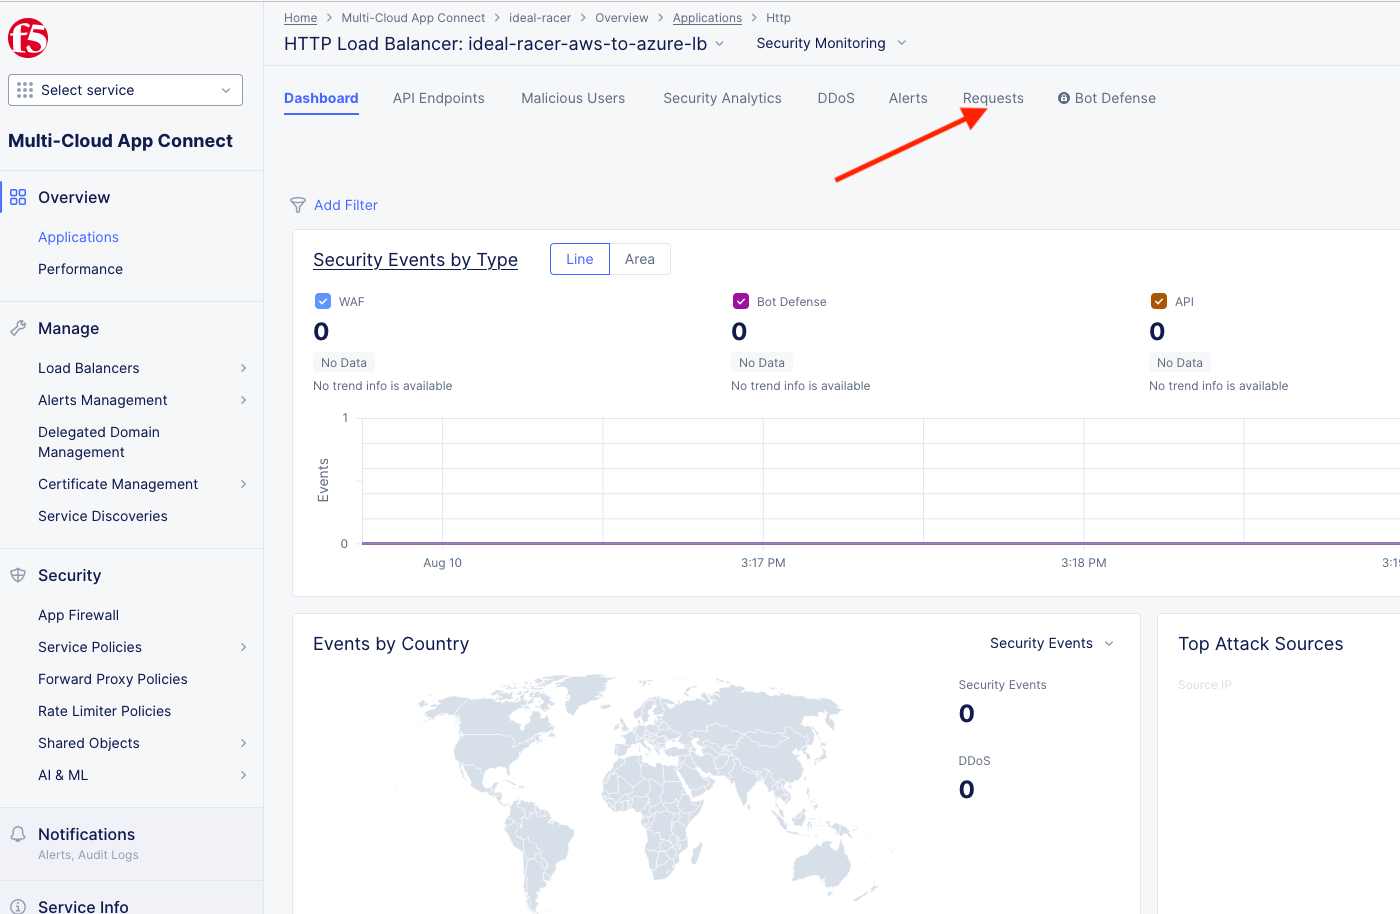
Take a moment to observe some of the analytics and then click on the Requests tab at the top of the page.
Here you will find the full request log. You will see the request path and if you click the little settings gear on the far right, you can add the Response Code given back to the client and several other metrics. You may have to click refresh in the upper right or change your time frame if you took a break or don’t see any data.
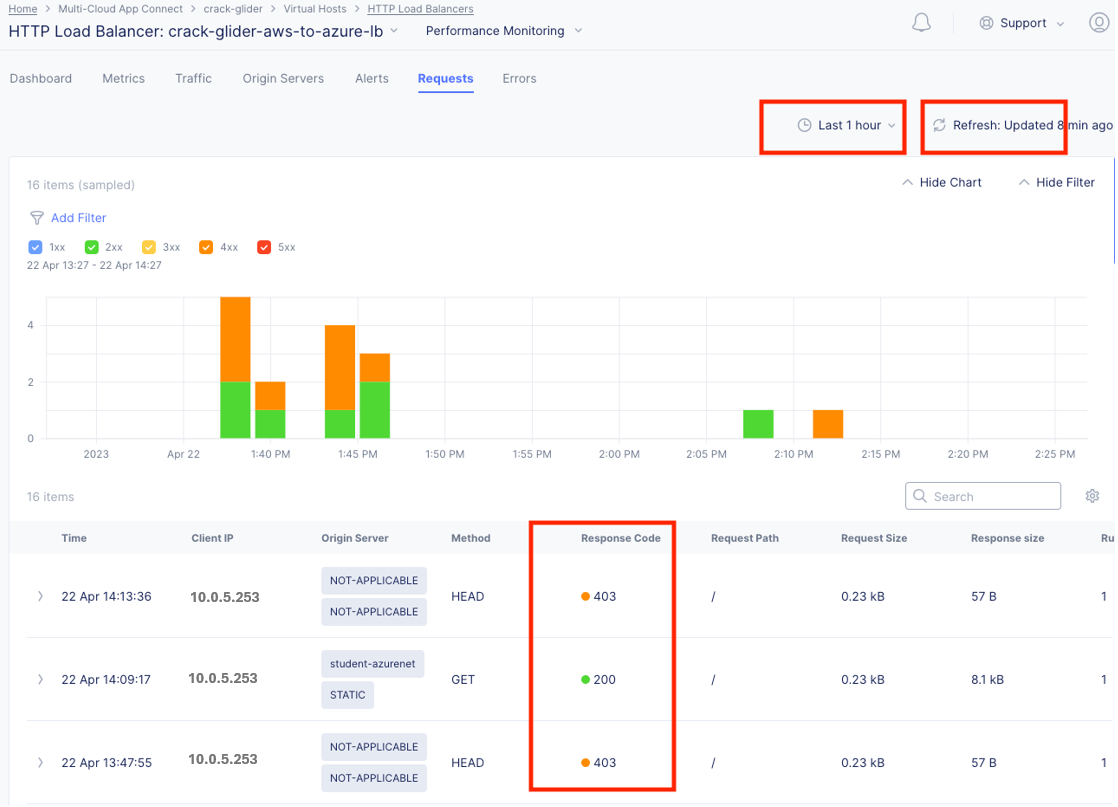
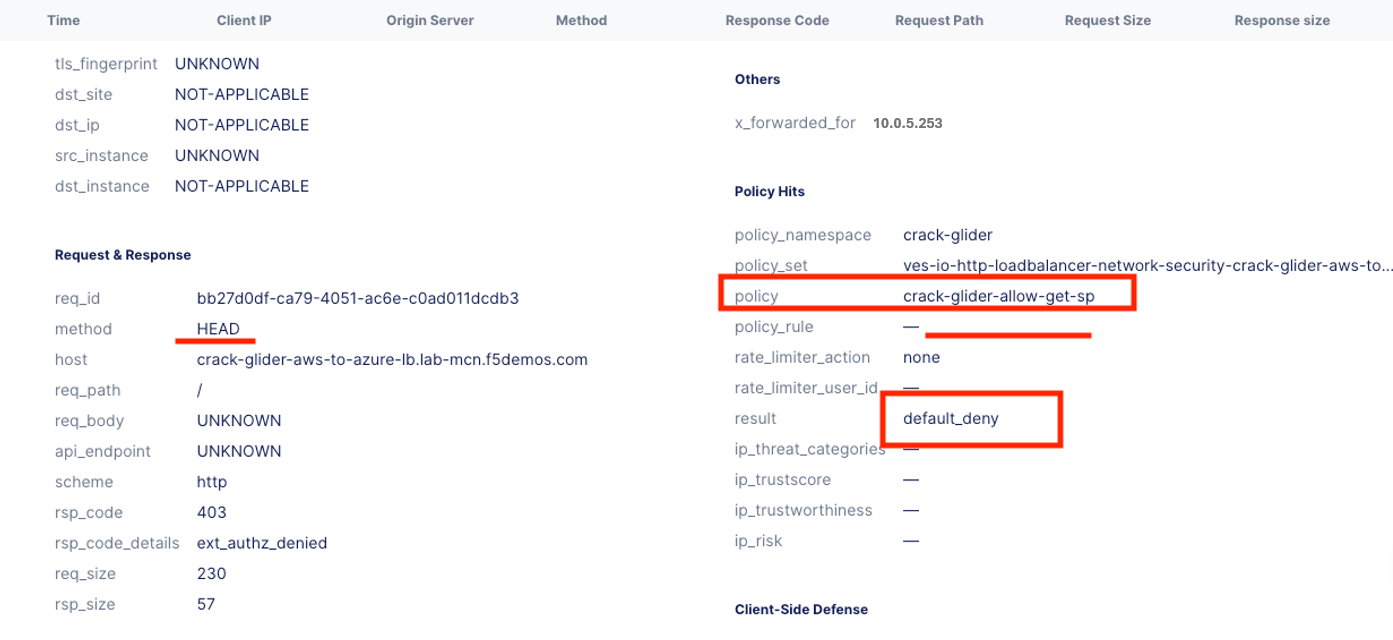
Expand one of the log entries that had a 403 response code. These were the forbidden Head requests. Look through the request data and determine the policy that was applied to the request as well as the result.
Note
If you do not see a response code column in the data, click on the wheel on the right, next to the search edit box and check response code. Click Apply.
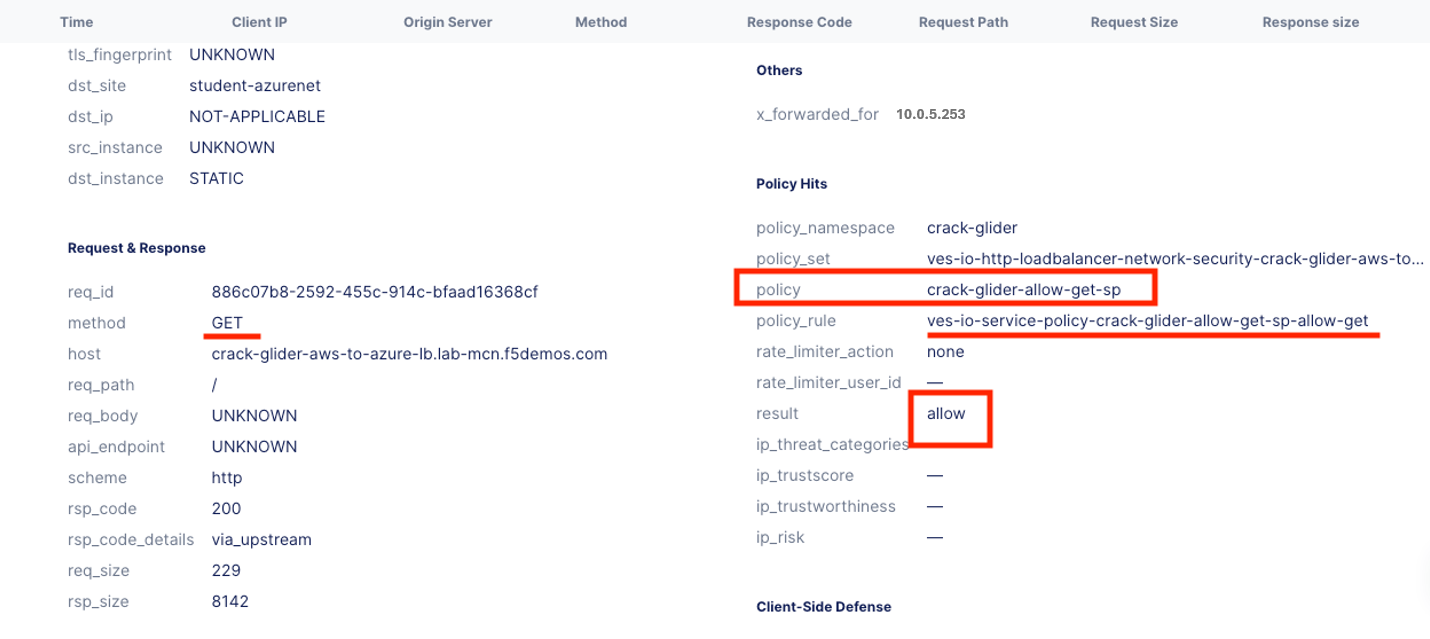
Expand one of the log entries that had a 200 response code. These were the allowed Get requests. Look through the request data and determine the policy that was applied to the request as well as the result.
Great job! You have now quickly completed every requirement thrown at you with F5 Distributed Cloud App Connect and Network Connect concepts.
Lab Summary
What You’ve Learned:
How App Connect solves IP overlap challenges using Software-Defined Proxies
How to create internal load balancers with custom VIP advertisement
How to use domain name enforcement in HTTP load balancers
How to configure Service Policies to enforce HTTP methods
How to apply Service Policies to load balancers
How to review request logs and verify policy enforcement
Key Takeaways:
App Connect uses proxies (Layer 7) to solve IP overlap that Network Connect cannot handle
Internal load balancers are created by advertising VIPs on specific CE sites
Domain name enforcement is built into HTTP load balancers for security
Service Policies provide granular control over allowed traffic
Default deny architecture ensures only explicitly allowed traffic is permitted
Request logs provide detailed visibility into policy enforcement
Your Environment:
You now have App Connect proxies providing secure connectivity:
Data Center to Azure: Internal load balancer on your UDF CE
AWS to Azure: Internal load balancer on AWS CE
Diagnostic Tool: Globally available tool for testing
Service Policy: Enforcing read-only access (GET only) from AWS to Azure
With this architecture, you’ve overcome IP overlap challenges while maintaining security and control over application traffic.
Important
You have successfully completed all ACME Corp requirements using F5 Distributed Cloud Network Connect and App Connect!
End of Lab 4